Thursday, July 28, 2016

Angel Cake ...from Scratch

'Angel Food Cake' or Angel Cake is tender, light, airy and virtually fat free! Homemade Angel Cake is worth the work but a tube pan with removable bottom is highly recommended. To create the light, airy texture, two baking techniques are used; sifting the dry ingredients numerous times to incorporate extra air and whipping the whites to a meringue. This delicate cake pairs well with berries and is a favorite of mine for summer entertaining.
Because this cake is made with only the egg white, there are a few ways around the dilemma of 'what to do with all those egg yolks'. You can purchase 'egg whites only' in the dairy section of grocery stores and measure 1-3/4 cups instead of 12 egg whites. I have used up to 2 cups egg white, adjusting nothing else in the recipe and the cake works out fine. I freeze egg whites for use later when making recipes that require only the egg yolk. Freeze 6 egg whites in each container, so it is measured and ready to bake with. Be very careful when separating eggs that absolutely NO egg yolk or fat of any kind gets into the egg whites or they will not whip properly. To use the frozen egg whites; defrost in the refrigerator, bring to room temperature when ready to start baking and follow the recipe below.

TRADITIONAL ANGEL FOOD CAKE            Yield: 8-10 servings
You can purchase 'egg whites only' in the dairy section of grocery stores, use 1-3/4 to 2 cups for the recipe below. Do not skip any of the sifting; it incorporates extra air needed for a perfect, light Angel Cake.
 

12 fresh egg whites, at room temperature 
Loosen the cake ONLY when completely cool

¾ tsp. sea salt 
1½ tsp. cream of tartar 
1½ cups granulated sugar 
1 tsp. pure vanilla extract 
1 cup cake flour 

Preheat oven to 375˚F. With the egg whites at room temperature add salt and beat to frothy. Add cream of tartar and beat until bubbles are small and white but shiny. Sift and measure the sugar. Fold ¾ cup sugar into beaten egg whites 1 tablespoon at a time to dissolve the sugar thoroughly. Sift flour and ¾ cup sugar four times. Fold gently into meringue ½ cup at a time. Gently fold in the vanilla and fill a 10-inch UNGREASED tube cake pan. Bake 30-35 minutes at 375˚F. Invert the pan to cool… DO NOT loosen the cake from the pan until the cake has completely cooled. 

Use a serrated knife and gentle sawing motion
Easy but certainly not fat free, is to decorate the cake with sweetened whipped cream, fresh fruit and berries. To fill; cut the cake in half, using a sharp, serrated (or bread) knife and a gentle sawing motion.  Once the cake is filled, fill the center hole with whipping cream and/or fruit and 'ice' the top and sides with the whipped cream.
To retain the Angel Cake fat free qualities, ice it with 'Seven Minute Frosting'. This easy frosting is cooked over simmering water, while beating for 7 minutes. The result is a fluffy, light icing that is sticky on the outside with a soft, marshmallow-like inside.  

SEVEN-MINUTE FROSTING        Yield: 3½ cups
This fluffy, no-fail icing must be used immediately.


2 egg whites 
1½ cups granulated sugar 
5 Tbsp. cold water 
1½ tsp. light corn syrup 
¼ tsp. cream of tartar 
½ tsp. pure vanilla or lemon extract 
3-4 drops of food coloring (optional) 

In the top of a double boiler, stir egg whites with sugar, water, corn syrup and cream of tartar until sugar dissolves. Place pan over simmering water and beat constantly with an electric mixer until mixture is stiff enough to stand in peaks when beaters are lifted, about 7 minutes. Remove from heat. Beat in vanilla, then food coloring drop by drop until frosting is desired color. Continue beating until icing is stiff enough to spread. Immediately spread icing over cake.
Filled, iced and decorated with fresh fruit and whipped cream
Till next time... have a safe, long weekend and Bon Appétit!


Photos by Sally Rae
Recipes from 'For the Love of Food' by Sally Rae 

Tuesday, July 19, 2016

Garlic Update 2016

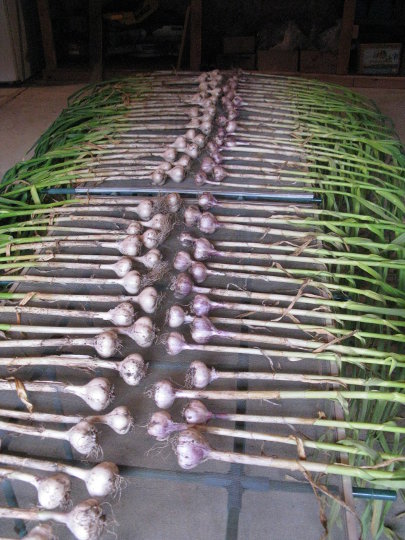
Garlic drying - Day14
Garlic drying - Day 1
It has been several weeks since the garlic was pulled. As forecast, the rain and overcast sky appeared on what was planned as my harvest day. I was happy to get the job done a few days early during a sunny moment!

The drying racks are old window screens. They are elevated off the ground, with a fan at one end for increased air circulation. Full details of curing, cleaning and storing your garlic harvest was covered in last years garlic post.

Through our dreary, rainy, July days, these adorable knee high, 'Music Box Sunflowers' from Salt Spring Seeds were they only ray of sunshine in the yard
'Music Box Sunflowers' from Salt Spring Seeds

Till next time... Happy Gardening and Bon Appétit!

Photos by Sally Rae 

Tuesday, July 5, 2016

Impatiently Waiting for Summer

Since our early, high temperatures several months ago, the 'wet coast' is waiting for summer to kick in ... again! I have heard numerous people complain of garden plants put in early, now going to seed. I can only assume they are confused by our hot then cool weather. Although my pickling cucumber plants have produced a few handfuls of baby dills, the plants are only about a foot long. Several days ago I covered them with hoops and plastic and hope they perk up. Crazy... for July!!

It has been difficult to dry the garlic bed. I removed the mulch and stopped watering several weeks ago. We have had sprinkles of rain the past few days and my next available day to harvest is calling for 80% rain. In a panic, I pulled the garlic this afternoon when the sun came out. The roots held onto more soil than I wanted, it was still a bit too damp. Now that it is pulled, I just have to deal with it. 
Transporting the 2016 garlic harvest to the shed

We were at a friends place on the long weekend and toured their garlic harvest. The garlic was tied in bunches, with the roots removed, and hanging in a breezy open shed. I have always left the roots on for drying, but this year because they held so much soil, I decided to try cutting the roots from some of each variety. My 2015 garlic harvest featured photos and information for a few different options of drying. This year, most of the garden is a week or two ahead of last year. The garlic was pulled on July 9th in 2015 and on the 5th this year. I would have preferred to wait another 3-4 days, but again, with the threat of rain, decided early is probably better.

Time will tell if I made the right decision to harvest a bit early ...and to cut off the roots. At least with the rain and cool temperatures I can get a few batches of soup made for the freezer and not feel guilty about being inside. 

Till next time... Happy Gardening and Bon Appétit! 

Photo by Sally Rae

Saturday, June 25, 2016

Early Summer in the Garden

Brassicas with trays for shade
Compared to last June, it seems most of this month has been rainy and cool. In the next day or so, it is supposed to turn around to hot temperatures again, so get prepared to shade delicate plants. We had some early, really hot, sunny weather that made planting seedlings a challenge. If some sort of shade was not used, most plants burned or wilted. There are numerous ways to shade the seedlings, I find plant trays with holes and a bamboo stake fast and easy. They can be set up horizontal or vertical, see Brassicas photo. 

 Burlap to protect from sun and heat
In the portable greenhouse, shade is created by a piece of burlap suspended inside, from the center and side supports. Another way to use burlap for a larger area is to use inverted tomato cages fairly close together. Push the top metal ring into the ground and anchor with a rock or tent peg. Gently arrange the burlap and push onto the upward facing tines to suspend it above the plants and hold it in place. This is sturdy in a light wind and allows air to circulate. I used this shade method last year along with cardboard and plant trays.   

When the shade trays are removed from all varieties of squash, each hill gets a stake placed as a marker for watering. When the plants get large and spread out, the stake is where the stem and roots are, so hand watering is easy. This is also done with pickling cucumbers and any other sprawling plants.

Bamboo stakes for squash
The garlic bed in the background is not quite ready to harvest. With warm, dry weather promised, I will pull a few test heads and carry on with my garlic harvest that I documented last year. In preparation for harvest, the straw mulch was removed from the bed today. Two weeks before harvest, or about the third week in June, I stop watering that bed.
Tomatoes, pruned and staked

The tomatoes have been staked for support. These plants are my 'Outdoor Salsa', now being sold on Denman through Annie Siegel as 'Sally's Salsa'. For all tomatoes, I prune leaves from the bottom so none touch the soil. Also prune out all suckers, (except one) that start growing from the leaf attachment on the stem. I allow the main stem and one off shoot, both are staked separately. With this particular variety, once the fruit is pollinated, I leave only 2-3 fruit per set. My main goal with these is seed saving and keeping this variety of very large fruit with few seeds. I am hoping to break my previous record weight of 1lb. 10-1/4oz for one tomato, from two years ago!

Strawberry hoops and netting
In the strawberry patch, I have tried several different methods of protecting the harvest from the birds. This is my second year using hoops and netting. It can be installed by one person with no lifting of awkward, heavy, frames required. These hoops were from Lee Valley and have become one of my favorite garden helpers! They can be used to support plastic, burlap, remay, or netting. Secured on the sides and end of the raised bed with 1"x1" wood strips that are light weight and easy to remove for picking. 
Desert King Figs

I was thrilled to count 65 figs ripening on my Desert King tree. The photo shows an area of the tree where I pinched the bud tips in the spring. Each of these branches produced 4-5 figs and several new shoots for next year's fruit. I am still working on the pruning and pinching method and realize some of these new shoots are on branches that will be pruned in the fall. Obviously my experiment needs to be tweaked. The tiny branch from my April 27th post  
Bud tip was pinched in April
is ripening nicely and this close up photo shows the new shoots, where I thought only a leaf would grow. 


Well, that's the tip of the iceberg around the garden these days! We have been enjoying fresh sugar snap peas, strawberries, cucumbers and baby zucchini. It is great to have longer days, be outside and have dirt under my fingernails. The weeds have got the best of me and taken over in some areas but such is life in Paradise!

Till next time... Bon Appétit and Happy Canada Day!

Photos by Sally Rae 

Thursday, June 9, 2016

A Craving for Chicken Salad

Everybody loves a good chicken salad sandwich. It's a great use of leftover chicken or turkey meat. Quench a craving with this twist on a classic! Dried cranberries add sweet, tart and color to the filling, celery adds crunch and walnuts add texture.

The type of sandwich you prepare will determine how chunky or fine the filling is diced. For everyday lunch sandwiches; the filling can be cut a little chunky and simply spread on buttered bread with lettuce. For use in a wrap; add a bit more mayonnaise for spreading consistency and dice all ingredients a bit smaller. Place a lettuce leaf on each wrap, spread the filling on the lettuce, covering three quarters of the wrap. Position a row of small avocado wedges or pickle spears and roll up. For pinwheel sandwich filling; add more mayonnaise and the ingredients should be very finely diced, almost minced. Your gluten free guests can also enjoy the feast... serve the chicken salad as a dip with rice crackers or rice cakes on the side.

CHICKEN SALAD SANDWICH FILLING       Yield: 2-3/4 cup filling

Once mixed, the chicken salad can be kept refrigerated for one day. This will allow the flavors to marry and improve.

2 cups diced, cooked, chicken meat 
Chicken Salad~sandwich, wrap, pinwheel sandwich and dip
1/4 cup celery, diced
1/4 cup dried cranberries, chopped 
2 Tbsp. walnuts, coarsely chopped
2 Tbsp. sweet Vidalia onion, diced
1/2 cup Real Mayonnaise
1 Tbsp. Dijon 
1/2 tsp. sea salt 
1/4 tsp. coarsely ground black pepper
1/4 tsp. granulated garlic

In a medium bowl, gently toss together the chicken, celery, cranberries, walnuts and onion. Sprinkle over the salt, pepper and granulated garlic and gently stir to mix. Add the Dijon with about half of the mayonnaise, then add more mayonnaise to the desired consistency. Taste and adjust seasoning.

Till next time... Bon Appétit!


Photo and recipe by Sally Rae 

Thursday, May 26, 2016

Garden Pests ~ Climbing Cutworms

Last fall I allowed the kale to self seed in a 4'x12' bed so I would have plenty to harvest through winter and into spring. To my surprise, by mid-winter all of the small to medium sized plants had been totally stripped of every leaf. I was blaming it on slugs until today...

Pupa of 'Large Yellow Underwing Moth'
While preparing that same raised bed for this year's winter squash plants, it did not take much digging to find the culprits who cleaned out the kale crop... climbing cutworms! They love winter brassicas and devour plants from about December through March. They pupate in April or May and once they move to this stage they are no longer feeding. Their pupa are these mahogany 'bullets' found in the soil. I found and removed upwards of 60 of these pupa from last winter's kale bed.
Besides the garlic and strawberry beds this was the only raised bed not covered with black plastic since the fall of 2014. I have had a problem with climbing cutworms, millipedes and slugs for the past 4 years and decided to leave the garden fallow for a year. I was planning on putting a few chickens in the garden enclosure to organically clean up the soil but that just has not happened yet. This revelation has put plans for chickens on the front burner again!

For more information and photos of the Climbing Cutworm, check out Linda Gilkesons'  December 8, 2014 Gardening Newsletter http://www.lindagilkeson.ca/gardening-pdf/Winter%20Gardening%202014%20-%20Dec%208.pdf

Till next time... Happy gardening!


Photo by Sally Rae  

Wednesday, May 18, 2016

Sweet Potato Salad

When I stopped eating the nightshade family; (potatoes, tomatoes, eggplant, peppers) I had cravings and felt pangs of deprivation for 'potato salad'! I had to find a substitute and began to experiment with sweet potatoes. They are available in a variety of colors and textures and are very different from a white potato... some are white fleshed with a dry texture, some are brilliant orange and moist.  

Erroneously we call the orange-fleshed sweet potatoes yams. A little history lesson... several decades ago when orange-fleshed sweet potatoes were introduced in the southern US, producers and shippers called them 'yams' to distinguish them from the traditional white-fleshed type. This was the English version of the African word 'nyami', referring to the starchy, edible root of the Dioscorea genus of plants. Which is why most people still think of orange-fleshed sweet potatoes as yams regardless of their true identity!!  
For more information on Sweet Potatoes, including a soup recipe, visit my previous post from last January, where I discussed this topic at length in 'Sweet Potato or Yam'
 
Whether are traveling for the Victoria Day long weekend or hosting a backyard pot luck, this salad is a safe bet with an oil and vinegar dressing rather than mayonnaise.


SWEET POTATO SALAD            Yield: 4-6 servings
For those of us who avoid night shades, this salad is delicious served warm or cold! 

2 lb. orange sweet potatoes
Sweet Potato Salad ~ delicious warm or cold!

1 sweet onion, red or white
Extra virgin olive oil
Sea salt
Freshly ground black pepper
1/2 cup pecans; roasted and coarsely chopped
3 Tbsp. Dijon mustard
2 Tbsp. red wine vinegar
2 Tbsp. cooking Sherry
1/3 cup grape seed oil
1-1/2 Tbsp. minced fresh parsley


Toast pecans on a bake sheet with shallow sides at 350F for 3-5 minutes, Remove from oven, transfer to a plate and set aside. Increase oven temperature to 425F and lightly oil the bake sheet, set aside. Peel and wash sweet potatoes, dice into 1/2 inch cubes. Peel onion and dice into 1/2 inch cubes. Toss diced sweet potato and onion in a large bowl with a drizzle of olive oil, season with salt and pepper. Place on prepared bake sheet and spread out into a single layer. Bake in preheated oven for 15-20 minutes, stirring once.
While the sweet potatoes cook, prepare the dressing. Whisk together Dijon, wine vinegar and cooking Sherry. Pour grape seed oil slowly in a thin stream, whisking constantly. Stir in minced parsley.
When the potatoes are tender when pierced with a fork, but not mushy, transfer to a bowl. Gently mix in toasted pecans. Add dressing and gently toss to coat. Serve warm or cold. Store tightly covered in the fridge.


Till next time... enjoy a safe, Victoria Day weekend and Bon Appétit!  


Photo by Sally Rae
Recipe collaboration with Elizabeth Williams