Tuesday, January 28, 2020

Winter Garden Harvest

This was my third year growing Lennox Organic Cabbage, needless to say I'm thrilled with the quality of this variety and would highly recommend it. I start seedlings for both summer and winter cabbage harvest and this is the second year that I've made my Garlic and Dill Pickle Sauerkraut in January before the weather turns cold. For the full story and process check out my post from January 2019, 'January Harvest and Sauerkraut Hack'.  
Second day of snow ~ Jan. 16th, 2020
This year our crazy cold snap and 22" of snow came early. I didn't mind the first few days with -8C temps, the snow was fluffy and light. By the third day we were looking at clearing heavy, wet, BC snow that was about a foot deep!! I picked my winter cabbage on the 12th of January and unfortunately the core was already frozen. 
Frozen core and cabbage tip burn
I also found a new problem called 'cabbage tip burn'. This is new to me and my research shows it is the result of mineral uptake, watering and high temperatures. Which explains why the cabbage isn't fully affected, it seems only on the summer growth. A whole new learning curve for me... Interesting, the smaller cabbages were not affected.


Lennox Cabbage harvest ~ January 12th, 2020
I had 23 pounds of cabbage to start with, and all the waste and trim was left out for the hungry resident deer. It was a very time consuming process to clean the cabbage and remove as much of the black tips as possible. It isn't harmful, I just did not want it to affect my kraut fermentation and storage in any way!

When all was said and done, I had over 6 quarts for the first ferment with dill weed and minced garlic added. After 8 days I dumped all the kraut into a very large, sterilized stainless steel bowl and mixed in 2 quarts of thinly sliced, fermented dill pickles I made last summer. Then the mixture was packed again into jars and topped up with a new brine ... a mixture of the original kraut brine and dill pickle brine. 
These jars were then left to ferment
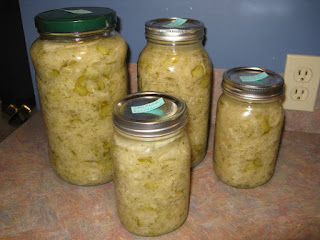
8 Quarts of finished Garlic & Dill Pickle Kraut
for another 4-5 days. After that time the flavor and texture were right, so the fermenting lids removed, storage lids put on and the jars stored in the fridge.
I had just finished eating last years batch so timing was good. This is a long and time consuming process but always worth the effort.
1st winter carrot harvest ~ January 25th, 2020
The cabbage was brought in before the snowfall and cold temps. The rest of the garden (kale, carrots, beets, strawberries and garlic) were covered with straw and maple leaf mulch to protect from the cold and snow. 
Just 3 days ago I removed the mulch from a small section of the first planted carrot bed and pulled the first winter carrots ... amazing!! Not sure if you recall, I had stopped growing carrots and parsnips because of the problems with carrot rust fly. Last summer I was determined to experiment and go through the arduous process of keeping the carrot beds covered with remay until late October. I'm thrilled to announce it worked! The carrots are clean, insect free, sweet, juicy, crunchy goodness!

After growing up in Alberta, I'm always so amazed and grateful for the food we can grow and harvest 12 months of the year here on the West Coast. The kale is small but so sweet after the cold weather and the garlic has poked through the mulch with shoots about 3" tall now. I've still got lots of carrots and some beets in another bed that were planted the end of June 2019. If the weather warms up too much, they will start to get 'hairy' and tough so they'll have to be pulled, washed and stored in the fridge. Not a problem, these carrots are worth the effort ... I love my winter garden harvest!

Until next time... Happy Winter Gardening and Bon Appétit!

Photos by Sally Rae
Garlic and Dill Pickle Sauerkraut by Sally Rae 
Saturday, January 18, 2020

'Grain-no-la' Bark

Translation ... "Grain-no-la" is my grain-free, nut based granola that after baking can be broken into chunks like bark or crumbled to resemble traditional granola. 

Avoiding grain can be a difficult task. Most people try to replace or reinvent their favorite grain based recipes with huge disappointment and usually costly experiments. I'm thrilled to report, this grain-free granola got high marks from both Paleo and non-Paleo diet friends and family! I used to like my granola chunky so either way this recipe fits the bill!
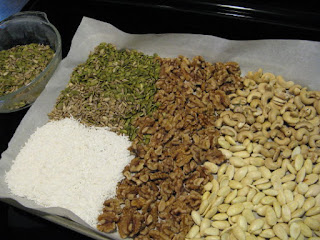
Activated nuts and seeds for 'Grain-no-la' recipe
Why use Activated Nuts and Seeds?
Nuts and seeds contain 'phytic acid' and enzyme inhibitors which forces the human digestive system to work overtime causing indigestion and a heavy, bloated feeling in the gut.

The way to reduce phytic acid and enzyme inhibitors is to soak, sprout and/or ferment the nut or seed. Sprouting is the basis of all plant life, concentrating nutrients and unlocking the germ of the seed to reveal its inner life. Soaking and dehydrating nuts and seeds at low temperatures provides superior nutrition and digestibility. 
This bark is a bit delicate, any chunks that crumble can be set aside to have with fruit and yogurt or just eat it out of the bag!!

'GRAIN-NO-LA' BARK   ~(Grain free, Gluten free, Paleo)   Yield: 2 trays bark
This recipe gives instructions to split the mixture into 2 small batches, then once chopped, mix them thoroughly together in a large bowl. You may need to split the mixture into more small batches, depending on the size of your food processor.

Ingredients:
Allow to cool completely on the parchment lined pan
1 egg white, lightly beaten
2 Tbsp. water
2 cups activated walnuts
1 cup activated cashews
1 cup activated almonds
1 cup activated pumpkin seeds, pepitas
1 cup activated sunflower seeds
1 cup unsweetened shredded coconut
3 Tbsp. melted coconut oil, cooled
1/2 cup organic pure maple syrup 
1-1/2 Tbsp. pure vanilla extract
1 tsp. ground cinnamon
1/2 tsp. fine Celtic sea salt 

Instructions
  1. Preheat the oven to 300F and line 2 half sheet (13"x18") bake pans with parchment paper.
  2. In a small bowl, whisk together the egg white with water until bubbly and slightly foamy. Add the cooled melted coconut oil, maple syrup and vanilla. Stir to combine.
  3. Into a large bowl, measure 2 cups walnuts, 1 cup cashews, 1 cup almonds, 1/2 cup pumpkin seeds, 1/2 cup sunflower seeds, 1 cup coconut, cinnamon and salt. Mix and put half of the nut and seed mixture plus half of the liquid into a food processor. Pulse until well chopped and combined, but leave the mixture nice and chunky. Dump into a large bowl. Repeat with the other half of the nut and seed mixture and liquid mixture, pulse until chunky. Add to the already processed mixture in large bowl.
  4. To this mixture add the remaining 1/2 cup each whole pumpkin and sunflower seeds. Mix thoroughly using a wooden spoon or your hands with disposable gloves. 
  5. Divide the mixture on the parchment lined bake sheets, spread into an even layer and bake for 20-30 minutes or until golden brown and crispy. Keep an eye on it while baking as it can go from done to burned quickly.
  6.  Remove pans from the oven and allow to sit at least 20 minutes to cool completely. DO NOT stir or break it up until completely cooled.
  7. Use your hands to gently break the bark into chunks
  8. When completely cool, gently break into chunks
  9. Once cool, store the Grain-no-la Bark in a zip type bag in the fridge for up to 2 weeks... if it lasts that long!! 
If you try this recipe, please share your comments below ... Thank you!
Until next time ... Bon Appétit!

Recipe by Sally Rae
Photos by Sally Rae