Saturday, February 18, 2017

Navy Bean and Smoked Sausage Soup

After seven days of snow storms and between power outages, I found the time to cook up a batch of hearty bean soup in the Instant Pot. Instant Pot instructions for dried beans state; "Dried beans double in volume and weight after soaking or cooking. To avoid overflow, please do not fill the inner pot more than half  capacity to allow for expansion." This recipe filled the inner pot to above the half mark but the beans had been soaked overnight and had already doubled in volume... everything went fine. There is another advantage to soaking the beans for at least eight hours; it speeds up the cooking process... and oh yes, it also reduces their gassy, 'tooting' effect! If you don't have a pressure cooker or Instant Pot, not to worry, this recipe can also be made on the stove top but the beans will take a bit longer to cook.

NAVY BEAN SOUP WITH SMOKED FARMER'S SAUSAGE           Yield: 8-10 servings
A hearty soup with added smoke flavor from the sausage and smoked paprika.
 
1-1/2 cups dry navy beans, soak over night
Fast, filling, bean soup in the Instant Pot
1 Tbsp. bacon fat or oil 
1 cup diced onion
1 cup diced carrot
1 cup diced celery 
3 cloves garlic, minced
1 lb. smoked Farmer's Sausage, sliced
1/2 tsp. Pimentón, smoked paprika
2 tsp. Worcestershire sauce 
2 large bay leaves, each broken into 3-4 pieces
2 tsp. dried oregano leaves
2 tsp. dried thyme leaves
1 tsp. dried sweet marjoram leaves
1-2 tsp. sea salt 
     OR 2 Tbsp. chicken soup base powder 
1/2 tsp. freshly ground black pepper
7-8 cups flavorful chicken stock
2 Tbsp. roughly minced parsley, for garnish

Drain the soaking liquid from the beans, pick through and remove any stones or foreign matter. Rinse beans and set aside. Heat bacon fat in the inner stainless steel pot with Instant Pot 'Saute' function. Add onions, carrot and celery; saute until the onions start to brown. Add the garlic, sausage, Pimentón, Worcestershire, bay leaves, oregano, thyme, marjoram, salt and pepper; stir and saute for a few minutes. Add the stock and beans, stir well.
Lock the lid in place, position the steam release to 'Sealing' and set the Instant Pot on high for 20-30 minutes. When the time is up, allow the pressure to come down naturally, about another 30 minutes.
When the steam pin drops, carefully remove the lid, tilting away from you. Remove the bay leaf and skim off any excess fat. You can mash some of the beans with a potato masher or just keep the soup as is. Taste and adjust seasoning. Serve hot with a sprinkle of minced parsley. 

Beat the winter blues with a steaming bowl of soup!
A fast, Instant Pot recipe for the family or freezer... great to take the chill off our unusual winter weather!

Till next time, stay warm and dry... Bon Appétit!

Recipe and photos by Sally Rae  

Friday, February 10, 2017

Growing Sweet Potatoes

Last fall I discussed a DIY version of starting your own sweet potato slips in; 'Sweet Potatoes ~ from Slips to Harvest'...  there are several ways to start the sprouts; in soil or water. I have heard using soil produces more sturdy, vigorous slips, so I am starting some with each method. A week after these photos, I found the sprouts growing faster in the water version rather than soil. However, in the soil, roots were growing alongside the sprouts, so I will monitor their progress and see how my comparison pans out.

Already sprouting in the kitchen
I bought three, orange flesh sweet potatoes last November. I stored these potatoes in the kitchen, above the stove on a turret for good air circulation. The kitchen is well lit with a temperature of 18-21C (65-70F.) The beginning of February, I planted two in soil, kept continuously warm and moist, and cut another in half, suspended with skewers in jars of water. (Be sure to rinse the jars and replace the water when it becomes cloudy.) The potatoes already had small sprouts, so now I will wait until the sprouts are 2-3 inches and vigorous. Then pull the sprouts off of the sweet potato and put into water until there are lots of roots. At this point, transplant them to starter pots with soil. When the slips are 6-12 inches tall you can plant them outdoors providing there is no danger of frost or move them to a greenhouse."
Cut in half in water ~ In moist, warm potting soil
When it is warm enough outside, transplant the slips 12-18 inches apart in tilled, fertile, well-drained soil. Plant deep enough to cover the root and about 1/2 inch of the stem. They are a vine, so provide some type of structure for them to climb and do not remove any of the foliage or vine as it grows. Water with a starter solution of fertilizer high in phosphorous, then water generously for a few days to be sure the plants root well. Water regularly after that, provide good drainage and don't let them sit in water. Deep watering in hot, dry periods will help increase yields. However, if you are planning to store some of the potatoes don't give them extra water late in the season. Weed occasionally but do not prune the vines, they should be vigorous. Harvest 3-4 months after planting when the leaves begin to turn yellow.

In the meantime, Denman Island has been hit with a week long, winter storm of unusual, heavy snowfall and power outages. It has been difficult to get computer time and cooking some days was either on the wood stove or outdoor propane BBQ. The temperature is rising above freezing and the snow has turned to rain. It will take us a day or so to dig out of this one!!
Day two of seven... and still snowing!

Till next time... Bon Appétit!

Photos by Sally Rae

Saturday, January 21, 2017

Chinese New Year

Chinese New Year, also known as Spring Festival in China is the most important traditional holiday in China. The date for Chinese New Year changes each year, although it always falls between January 21st and February 20th. This year, January 28th begins the Year of the Rooster on the Chinese Calendar.

In the recipe below, Sambal Oelek is a chunky, ground, chili paste with no other flavors added. This provides the simple, pure taste of chilies. It does pack some heat, so add slowly and adjust to your taste. Sambal Oelek can be found in import shops, at Runge's Delicatessen in Courtenay and some grocery stores in the import aisle. For a substitute, try Sriracha, it is slightly sweeter with a touch of garlic but they are comparable in 'chili heat'. The other difference is the Sriracha is smooth and Sambal Oelek is a chunkier paste.

Indonesian Spring Rolls                  Yield: 24 small Spring Rolls 
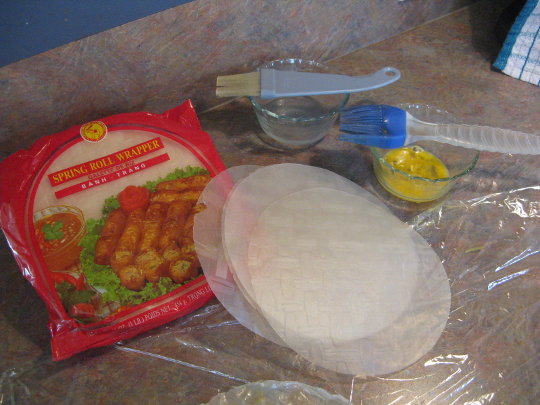
For this recipe, use the small, 6-1/2" diameter rice papers, sometimes called Spring Roll Wrappers. These rolls should be prepared no more than 4 hours ahead of cooking. Store them covered in the fridge. They can also be frozen, uncooked, for up to 2 months.

24 dried rice paper wrappers (6-1/2" diameter)
Small, rice paper (Spring Roll) wrappers...
Brush one side with water the other side with egg.
1 egg, lightly beaten
water
2 pastry brushes
oil for deep frying

Filling: 
1 Tbsp. sesame oil
6 medium, dried shiitake mushrooms
2 carrots, cut into 1/2" long julienne strips
1/2 small suey choy (Chinese cabbage), finely shredded 
1 medium onion, cut into julienne strips 
1 clove garlic, minced 
1 Tbsp. cornstarch 
3/4 tsp. Sambal Oelek, or to taste
1 egg, beaten

Dipping Sauce: 
2 Tbsp. demerara sugar
2 Tbsp. rice vinegar
2 tsp. grated fresh ginger root
1-1/2 tsp. Sambal Oelek

Place dry shiitake mushrooms in a medium bowl and cover them with hot water. Cover the bowl and set it aside for 20 minutes. When the mushrooms have softened slightly, strain the liquid through a coffee filter or several layers of cheesecloth. Reserve 2 Tbsp. mushroom liquid for later in the recipe and the rest for stock, sauces, or discard. Remove the mushroom stems and discard. Cut the caps into thin julienne strips and set aside.
Assembly Step #1
Heat sesame oil in a large skillet. Add the onion and saute until soft, add the garlic and saute until the onion is golden but don't burn the garlic. Add the julienne cut shiitake mushrooms, carrots and shredded cabbage and the 2 Tbsp. reserved mushroom liquid. Stir fry the veg over medium-high heat, just until they are still crispy. Sprinkle over the cornstarch and mix in gently. Remove the skillet from the heat, add sambals, egg and mix well. Transfer mixture to a bowl and refrigerate until cool.
Assembly Step #2
While the filling cools, make the dipping sauce. Measure all ingredients into a small glass or plastic jar with a tight fitting lid. Cover the jar, shake vigorously and set aside. 
Preheat the oil for deep frying to 350F to 375F.

To assemble the Spring Rolls: 
Step #1- cover a clean work surface with plastic wrap. Place rice paper, on the plastic wrap and brush one side lightly with water, then turn the rice paper over and brush the other side with beaten egg. Let stand just until the rice paper softens. Place one tablespoon of cooled filling on each rice paper and fold over to just cover the filling. 
Assembly Step #3
Step #2- Fold the sides in and continue to roll up snugly. 
Deep fry until lightly browned
Step #3- Continue filling and rolling until all ingredients are used. Place finished rolls between layers of plastic wrap on a bakesheet. Cover with plastic wrap and a damp, not wet, cloth. 

Deep fry in preheated oil for about 3 minutes or until lightly browned. Drain on paper towels. Serve hot with dipping sauce. 

*CHEF'S NOTE: You can prepare and deep fry these rolls up to 6 hours prior to serving. Cool completely and cover them with plastic wrap. Store in the fridge until serving time. To serve, place in a preheated 375F oven for about 8-10 minutes or until hot throughout.
 
Indonesian Spring Rolls with Dipping Sauce

Till next time Kung Hei Fat Choi and Bon Appétit!

Recipe and Photos by Sally Rae

Sunday, January 15, 2017

Instant Pot

A few of my friends have been raving about their electric pressure cooker, 'Instant Pot'. Having never heard of it, I did some research. I had 2 small appliances that needed to be replaced and this would replace both, with the added bonus of a stainless steel inner pot rather than a non-stick coating. So, Instant Pot went on my wish list to Santa this Christmas. 
Instant Pot IP-LUX60
Instant Pot is advertised as "the next generation Electric Pressure Cooker designed by Canadians specifically for North American consumers." I have the Instant Pot IP-LUX60 which is a 6-in-1 programmable cooker combining the functions of a pressure cooker, sauté/browning, slow cooker, rice cooker, steamer and warmer. Some of the great features are 3 temperatures in Sauté for browning or thickening, and 3 temperatures in Slow Cook to complete the tasks of a common slow cooker. The stainless steel inner pot leaves no health concerns of non-stick coating residual. A Steaming Rack, Soup Ladle, Rice Paddle, Measure Cup, Instructions, Recipe and Cooking time table in several languages are included.

IP-LUX60 - What comes in the box...
All the instructions can be a bit intimidating. I suggested to a few newbies, just put in a few cups of water and run it through a test.
I make big batches of soup, turkey chili etc. for the freezer that I use for lunch when I work ...or otherwise need a quick meal. They are labelled and frozen in 2 cup yogurt containers. Photos of my freezer soups can be found on my post 'Freezer Meals' from last November. These are an easy meal with the microwave to defrost and heat for lunch BUT..... Mom does not have a microwave and she now has an Instant Pot!!

Today I took a Spicy Sausage and Kale Soup, (frozen lump) directly from the freezer to test. Here is what I did and the results...

- Pour in 40ml of water, or enough to cover the base of the stainless steel inner pot
- Remove the frozen item from packaging and place the lump into the pot already coated with water
- Lock in the lid and move the steam releasing handle to 'sealing'
- Press 'Manual' then press the minus sign (-) to program for 15 minutes
- When the cooking time is complete ...you can do a quick release by moving the steam release handle to the 'venting' position OR allow it to do a natural release and let it go to keep warm if you are busy

...I used the quick release method and there was still a small frozen ball from the center. I broke it up and put the lid back down for a few minutes and it was hot and ready. For bigger blocks I would suggest the natural release method, or adding a few more minutes to the original time.


The
little soup ladle that comes with Instant Pot, fits perfectly to the inside pot to spoon out all the hot liquid. This is only the second try with my new Instant Pot and I have already moved the slow cooker and my rice cooker out of the kitchen!! 

Another way to defrost food is to do a pot in pot where you put your frozen food in a pot that fits inside the Instant Pot. Then add water to the Instant Pot, then the steam rack and then the pot with the frozen food.
I love how fast and easy it is to use and the clean up is fast and simple... watch for more of my Instant Pot success stories and recipes in the future!

Till next time... Happy New Year and Bon Appétit!


Photos by Sally Rae