Saturday, April 29, 2017

Introducing my 'E~Z Pickler' ~ Single Jar Fermenting Kit

'E~Z Pickler' Single Jar Fermenting Kit
My Grandmother used to make amazing fermented sauerkraut at home in a large crock. Back then, there were no basements as we know it. The crock with its perpetual fermenting contents, was kept in the root cellar. Shredded cabbage was pounded with salt to release its juice, then packed into the crock and kept below the brine level with a round board that was weighted with a rock. This was to prevent unwanted bacteria that would result in mold on the fermenting 'kraut. The crock and its contents were then draped with a cloth to keep out contaminants. 

Wanting to replicate a smaller version of my Grandmother's sauerkraut, I researched the German Harsch Fermenting Crock. It is a stoneware crock with two weighting stones that fit inside. The lid fits inside a gutter at the rim that holds water, allowing fermentation gasses to escape yet sealing out air and contaminants. The extravagant price tag plus high shipping costs led me to research, develop and assemble a 'Single Jar Fermenting System' that I call the 'E~Z Pickler'.

What's in the 'E~Z Pickler' Single Jar Fermenting Kit
My main goal was to create an air-locked fermenting lid assembly with a high quality, BPA free, food-grade silicone, ring seal and grommet, instead of using rubber components. This lid assembly is used with a mason jar which allows fermenting smaller batches that are stored in the same jar in your fridge. The lid assembly fits wide mouth half-pint, pint, quart and 2-quart jars. Depending on the size of jar used, you can experiment with smaller recipes; trying different vegetables or combinations of herbs and spices to your preferred taste. The enclosed Instruction and Recipe Booklet provides plenty of free space to jot down your creations so you can change or replicate a favorite recipe in the future.

The 'E~Z Pickler Kit' is a compact and complete unit including: instructions and recipes, 1-quart fermenting jar, storage lid, stainless steel separator cup, Celtic mineral sea salt and an air-locked fermenting lid assembly to prevent unwanted bacteria that would cause mold. To ferment vegetables at home with the 'E~Z Pickler', all you need to add is; filtered water (chlorine, soft or hard water may affect culture) and fresh vegetables (preferably organic or untreated), locally grown and in season are best. After a few days of fermenting at a comfortable room temperature, they only need refrigeration. When fermentation is complete, the vegetables are still raw, but have transformed into a more digestible food that stays fresh for 4-9 months but MUST be stored in the refrigerator. 
Fast and easy - brined cauliflower

My fermenting adventure began with Brined Cauliflower and it remains a favorite. A versatile vegetable to ferment simply with just a salt brine or with added dill weed, pickling spice and/or garlic. It is easy, fast, delicious ... and addictive! Sauerkraut takes a bit more time and energy; shredding the cabbage then pounding or rubbing with salt and weighting it to release its juice before packing into the jar for fermentation. Brined Dill Pickles are also a bit more preparation but well worth the effort.
Cool Breeze replaced with Corentine

I have replaced Cool Breeze with Corentine pickling cucumber seed (from William Dam) specifically for this purpose. For those who follow my Seasonal Food Blog, you have seen the photos and heard my rant over these delightful, uniform, adorable cukes! Fermented Dill Pickles are sometimes referred to as 'half sours' and are not to be mistaken by the flavor of a store bought, vinegar preserved cucumber pickle. They can be called 'full sours' by adding apple cider vinegar after fermentation but do not have the vinegar tang we commonly identify as a dill pickle. They are none the less delicious and to my fermenting friends and family ... a highly desirable commodity!!
Fermenting assorted fresh, summer vegetables

I often 'top up' or 'decorate' a jar of tiny cucumbers with; cauliflower, thinly sliced rounds of daikon radish or julienne strips of kohlrabi or carrot before fermenting. 

I am cautiously rationing the last 2 quart jar in my fridge of Brined Full Sour Dill Pickles from August 2016 ... my mouth waters at the thought!

The 'E~Z Pickler' Single Jar Fermenting Kit price is $32 CAD. Please note ... depending on your location, shipping costs may apply.
To purchase or inquire about the 'E~Z Pickler', send me your name and address (including postal code) with 'Pickler' in the Subject line. 

Till next time... Happy Spring and Bon Appétit!


'E~Z Pickler' by Sally Rae
Photos by Sally Rae 

Tuesday, April 11, 2017

Ricotta Cheesecake in the Instant Pot

In my wildest dreams, (yes I do dream about cooking and food!) I never imagined making cheesecake in my new Instant Pot!
Cheesecake cooked in Instant Pot

I love cheesecake but cream cheese doesn't agree with my digestive system. I have found ricotta gives no negative reaction and is an incredible treat! My Ricotta Cheesecake journey developed through my previous 'How to Make Ricotta' post, my recent Instant Pot (IP) obsession and an IP website called 'This Old Gal'. Said website came with high recommendations from the friend who inspired me to try the Instant Pot in the first place

I was advised that Jill's Blog, 'This Old Gal', had the most reliable IP cheesecake techniques and instructions... already kitchen tested with impressive results! And there they were, several incredible pressure cooker cheesecake recipes including a Meyer Lemon and Authentic Italian, both made with Ricotta cheese
Pressure Cooker Lemon Curd 

I can't get enough of Jill's 'Pressure Cooker Authentic Italian Ricotta Cheesecake'. I use Limoncello Liqueur instead of Ameretto, omit the orange zest, instead use all lemon zest and don't use the optional crust. Topped with her recipe for 'Pressure Cooker Easy Lemon Curd'; it's an impressive, delicious, light dessert or snack. Both recipes are quick and easy with the Instant Pot.

Decadent chocolate desserts are one of my specialties when entertaining, so I developed a Ricotta Chocolate Cheesecake for the Instant Pot. I follow Jill's expert method of cooking in the IP and use my homemade 'Ricotta Cheese' with the added cream. I made numerous test cakes with store bought Ricotta which produced a texture and quality was drastically inferior. I would strongly advise for Ricotta Cheesecakes to make your own Ricotta using the heavy cream, it is so easy!! I also purchased a second inner lid seal for my IP so there is no flavor/odor transfer. One seal is used for savory cooking and the other for sweet. 

Thank you Jill, for sharing your beautiful, informative food blog, incredible Ricotta Cheesecake recipes, instruction, food photography and Instant Pot knowledge!
Bon Appétit!

INSTANT POT RICOTTA CHOCOLATE CHEESECAKE              Yield: 6 servings
~This recipe is best made with creamy, homemade Ricotta Cheese that has been drained until quite dry.
    Drain overnight in the fridge. 
~If tapioca starch is used instead of flour, this recipe becomes gluten free. 
~'Dutch cocoa powder' is darker in color and has a smoother and more mellow flavor than natural cocoa. 

1 lb. (450g) drained, homemade ricotta cheese
IP Ricotta Chocolate Cheesecake with Ganache Topping

1/4 cup heavy cream
1/2 cup packed brown sugar
1-1/2 Tbsp. Dutch cocoa powder
2 tsp. tapioca starch (or flour)
1/8 tsp. sea salt
1 tsp. pure vanilla extract
3 large eggs, separated

Ganache Topping:
3 oz. high quality, dark Belgian 
    chocolate, finely chopped
1/4 cup heavy cream

Line a colander with 2 layers of damp cheesecloth and elevate over a bowl. Dump in the Ricotta and drain for at least 8 hours or overnight. Generously butter a 7-inch springform pan.

Place drained Ricotta, heavy cream, salt, vanilla and egg yolks in a food processor or stand mixer with a paddle attachment. In a small bowl whisk together the brown sugar, Dutch cocoa and tapioca starch, pour in with the ricotta and mix immediately on medium speed until very smooth. About 3-4 minutes.
In a clean bowl, whip egg whites to soft peaks. Gently fold egg whites into cheese mixture. Pour into buttered pan and level.
Cover the cheesecake first with a paper towel and then with a piece of tinfoil and secure it around the sides with butcher string. Pour 1-1/2 cups water to the inner pot of the Instant Pot (IP), place cheesecake on the steam rack (or trivet) and carefully lower into the IP. Lock the pressure cooker lid into place and set to 'sealing'. Set pressure to high for 40 minutes. Allow a 10 minute natural release. After the pressure has been released, open the IP and gently remove the pan. Remove butcher string, foil and paper towel. Blot off any liquid that may have accumulated. Let cool on a wire rack for 45 minutes to an hour. Remove cheesecake from pan, cover loosely with wax or parchment paper and place in the fridge overnight or until totally cooled.

Prepare the Ganache Topping: In a small saucepan over medium/low heat, scald the cream, do not boil. Remove from heat and whisk in the finely chopped chocolate until smooth. Set aside to cool slightly. Pour topping over chilled cheesecake and smooth so it drizzles down the sides. Keep cake loosely covered in the fridge.
* For a Ganache Sauce to serve on the side:  adjust the Ganache Topping recipe above, increase heavy cream to 1/2 cup, once the mixture is smooth, add 1-1/2 Tbsp. liqueur or strong brewed coffee.
Alternately, serve slightly cooled *Ganache Sauce on the side
Till next time... Happy Easter and Bon Appétit!

Recipe by Sally Rae
Photos by Sally Rae

Tuesday, March 21, 2017

Homemade Fresh Paneer

Fresh pressed Paneer Cheese
'Paneer' is a firm, chewy, milky-tasting, fresh cheese used in some of my favorite Indian dishes
To make a simple paneer cheese; follow the recipe for Ricotta Cheese, then gather the cheesecloth, gently squeeze, then hang for an hour or so to remove the excess whey. Shape into a rough rectangle, then fold the cheesecloth tightly around it for a neat package. Place on a perforated strainer, steamer basket or folded cotton tea towel then on dinner plate and press it beneath a weighted plate in the fridge for at least one hour or overnight

Paneer will keep its shape and not melt
Once pressed, the paneer can be used immediately, no aging or culturing required. It can be refrigerated for up to two days. Refrigerated paneer will be firmer and less likely to crumble than fresh paneer. 
Paneer will not melt or get gooey like mozzarella or cheddar. This provides the advantage of being stirred into soups or curries and still keep its shape and chewy texture.  
That said, this homemade version has a more delicate, soft texture and will break down in hot dishes. To prevent this, add the cubes just before serving. A method to firm it up so it can be added to hot gravy or sauces is to knead a few teaspoons of cornstarch into the cheese before pressing. It will still be delicate and soft but will hold its shape.

With the added cornstarch for stability, these paneer cubes are delicious tossed into a curried pasta salad, or dropped into hot soup. It is perfectly acceptable to nibble on a few cubes as a snack or as you work. Just be sure to leave enough for your recipe!
Curried Pasta with Paneer, Pulled Pork and Broccoli

Till next time... Bon Appétit!

Photos by Sally Rae 

Tuesday, March 14, 2017

How to Make Ricotta Cheese

Fresh Homemade Ricotta Cheese
Fresh, creamy 'Ricotta Cheese', is easy to make at home and very versatile. Drizzle on some good olive oil and serve as an appetizer spread, use in pasta recipes, as a base for Ricotta Cheesecakes or make 'paneer'; a firm, chewy, fresh cheese. My next post will give instructions on 'How to Make a Simple Paneer' from the Ricotta Cheese recipe below. 

You are not going to believe how fast and foolproof it is to make your own Ricotta. Once you make this easy and delicious recipe, you'll never buy grocery store ricotta again! The process for making ricotta works best when using organic whole milk. Enough milk is needed to separate into curds and whey. You can control how wet or dry the ricotta is by simply how long it is allowed to drain.
~~~~~~~~~~~~~~~~~~~~~~~~~~~~~~
*CHEF'S NOTES:
  *For a higher yield and a creamier, more silky ricotta cheese; replace 1-1/2 cups milk with heavy cream.
  *Non-reactive cookware is made from stainless steel, ceramic, glass or enamel coated metal.
~~~~~~~~~~~~~~~~~~~~~~~~~~~~~~
HOW TO MAKE RICOTTA CHEESE       Yield: about 1-1/2 to 2 pounds Ricotta 
If the ricotta will be used for a dessert or for higher yield, use the heavy cream replacement.

1 gallon whole milk  (OR replace 1-1/2 cup milk with heavy cream)
1/3 cup white distilled vinegar 
1 tsp. salt

In a non-reactive pot, slowly heat the milk on medium-low heat to prevent scalding. Stir often until it reaches 185F. Remove from the heat and add the vinegar and salt, stir gently just to mix. The curds will begin to form immediately. Cover the pot and let sit for one to two hours to allow the curds to fully develop. 
Drain to separate the curds and whey

Line a shallow colander with 2 layers of damp cheesecloth and pour the curds and whey into it. Discard the whey or reserve for another use. Place the colander and curds over an empty bowl and let the cheese continue to drain for one to two hours, or overnight... depending on how dry you want your ricotta cheese to be. One to two hours is generally sufficient for a soft ricotta. Six hours or overnight is required for a firm ricotta cheese.
For a firm cheese, drain overnight
Keep the colander over an empty bowl so any remaining whey can drain and keep the cheese from becoming soggy while stored in the fridge. 

Once drained, transfer to a container, cover and refrigerate it promptly. It will keep up to a week in the fridge. To be on the safe side, discard ricotta cheese that has been in your fridge for longer than two weeks.  

Alternatively, ricotta freezes very well. To freeze, tightly seal the package and freeze. If freezing for longer than two months, place the container inside a heavy duty freezer bag in order to prevent freezer burn. When ricotta is thawed there may be some liquid at the top of the container, simply stir it back into the cheese or place in a cheesecloth lined colander and crumble it up so it can drain a bit more.  

The whey can be used in any baking recipe in place of water, whirled in your smoothie or drink it over ice. Freeze the whey in one cup containers to use in pancakes, bread or any recipe in place of water. I have even used it to extend turkey gravy when there wasn't enough turkey stock. 

Till next time... Bon Appétit!

Photos by Sally Rae
Recipe by Sally Rae

Wednesday, March 8, 2017

Hand Pulled Noodles

I love noodles! A Google search proves there are many different methods and styles of pulling Asian noodles. When the opportunity arose for me to watch and learn, one-on-one, how to 'hand pull noodles', I jumped at it!! 

I was honored to meet a mother and daughter from TAIYUAN, in Northern China. These noodles are a common meal in their home, to me it's an incredible culinary art. I was thrilled to watch, practice and ask questions in person, first hand... an opportunity of a lifetime for me! 
Roll, rest and ready to start
Cut, keeping one end intact

The dough, made from a special high gluten flour, water and salt, takes time to knead and rest so was already prepared and ready to roll and cut. We were told the knife they use is twice the size we had available and the board they use is four times the size of ours, so she had to compromise and downsize her method.

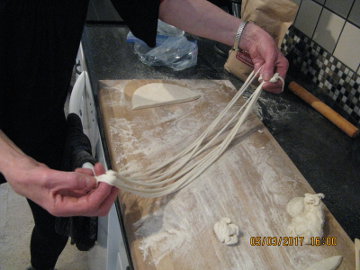
The soft, supple dough was rolled with a special wooden rolling pin. The end cut was removed and set aside. Then noodle cuts were made, keeping one end intact. I was instructed, (and did not perfect) a quick, strong, flick of the knife blade at the end of each cut. This flick turned the cut edge of the dough upwards, so it could be floured and the noodles would not stick together. Once the strips were cut and floured, they were rolled over each other into a rope. Wrists are crossed so when the rope is picked up it is twisted again. 

It was amazing how strong the dough was, yet soft and pliable. Once the rolled rope is picked up and twisted, it is gently stretched while pounding on the floured board. I was timid to break the noodles but was assisted to spread my arms further apart to stretch the dough thinner. As I became more confident, the noodles were doubled over and then pulled and pounded more.

A wok of boiling water was kept on the stove. Once pulled and ready, the noodles were immediately lowered into the boiling water. The connected end of dough was pinched off at this point. Once in the boiling water, the noodles were stirred with chop sticks. When the noodles were floating near the top of the boiling water, they were ready to be removed and served fresh and hot.
The left over, made into 'cats ears'

Into the wok
The left over 'scraps' of dough were not wasted. They were gathered together and gently kneaded. Then cut into small pieces and rolled under the thumb almost like a tiny gnocchi. They translate to 'cats ears', and were also cooked in boiling water until they float. Then served with the same toppings.

Before the noodles were made, two toppings had been prepared; one of egg and tomato, slightly sweetened with sugar, and a stir fry of prawns, mushrooms, potato, red onion, broccoli, cabbage, tofu and a special sauce brought from China, that had a kick of heat. As the noodles were ready, they were portioned into bowls, topped with the sauces and enjoyed by all of us. By that time I was so interested in eating, I forgot to take photos!! The noodles had a chewy, substantial texture and the topping accompaniments, fresh, flavorful and delicious.
Several days later, I still reflect on this incredible experience and hope to make an attempt to replicate it at home.

Till next time... Bon Appétit!

Photos by Sally Rae