Showing posts with label Gift from Your Kitchen. Show all posts

Thursday, March 31, 2022

Have You Tried Chimichurri?

Chimichurri Mise en Place - fast and simple!
Chimichurri is a fresh condiment originating from Argentina and Uruguay made from finely chopped fresh parsley, oregano, garlic, olive oil, red pepper flakes and red wine vinegar. It is a bright, tangy, fresh sauce traditionally used on grilled meats, but is good on almost anything and everything!! Try it tossed with steamed vegetables, with chicken, fish or shrimp, drizzled over eggs, used as a dressing for pasta salad, drizzled over pizza after baking, used as a sandwich spread with (or without) mayo. The possibilities are endless ... and it takes only 10 minutes to make!

Chimichurri - start to finish

Chimichurri is not Pesto, they may look similar ... they are both herbaceous, green sauces made with olive oil but they are not at all similar in flavor. Also, Chimichurri has no nuts or cheese making it a perfect, condiment for nut and dairy sensitivities, vegetarian, low carb, gluten free and Paleo diets.

 Some Chimichurri recipes use cilantro instead of oregano and some add smoked or hot paprika and shallots which are not authentic. I prefer the cilantro version for vegetables, salads and pizza, and the authentic oregano version for grilled meats. Although, the flavor of cilantro is an acquired taste for many.

Creamier sauce
For a creamier sauce, add everything into the food processor then pour the olive oil in while the machine is running. This will thicken the sauce slightly and blend it to creamy looking and smooth.

With grocery prices on the rise, why not add cilantro and Italian parsley to your herb garden this year? Chimichurri can be made all summer and frozen for future use to liven up your winter meals. It can be stored in a covered container in your fridge for up to 5 days or packed in small jars and given as gifts marked with the preparation date, best before date and freezing instructions.
If you have never heard of ... or tried this tangy, fresh sauce, what are you waiting for? 

Chimichurri with Cilantro        Yield: about 1 cup
1 cup fresh cilantro *see Notes below
Chimichurri drizzled over Vegetarian Pizza
1 cup Italian (flat leaf) parsley *see Notes
1 shallot 
3 large cloves garlic
Zest of 1 lemon
2 Tbsp. red wine vinegar
1/2 tsp. sea salt
1/4 tsp. coarse ground black pepper
1/4 tsp. red pepper flakes, optional
1/4 to 1/2 cup olive oil

Thoroughly rinse the cilantro and Italian parsley several times. Pick out any bruised or yellow leaves, remove heavy stem ends. Peel shallot and garlic, roughly chop. Combine all ingredients except olive oil in a food processor and pulse to reduce the bulk of the herbs. Slowly pour in the olive oil and pulse to desired consistency. Stop periodically and scrape down the sides of the processor bowl. Allow to rest for at least 15 minutes for the flavors to marry before using.
 
Fresh and packaged for the freezer
Store in an airtight container in the fridge for up to 5 days. For the freezer; package in 1/4 to 1/2 cup portions or freeze in an ice cube tray. Then store in airtight containers in the freezer for up to 1 year. Thaw only the amount needed.

**CHEF'S NOTES:
Do not use dried herbs for this recipe, only fresh will do!
One 'bunch' of fresh cilantro or Italian parsley is about 1-1/2 cups each.

Until next time ... Bon Appétit!

Recipe by Sally Rae
Photos by Sally Rae

Monday, March 7, 2022

Thai Double Blue Butterfly Pea

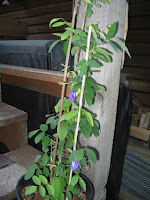
The 'Blue Butterfly Pea' is an edible, blue flowered, vining plant, native to Southeast Asia. The vines are smothered in dazzling indigo petals. The flowers are used as a natural food dye and soothing tea to calm the nerves. The double flowered type seed I grew was found in Thailand, where blooms are used to dye everything from teas to rice and desserts. Butterfly pea has a mild, floral flavor and a most intense natural color making it a novelty culinary ingredient.

At the beginning of Covid lock downs in 2020, I received 'The Baker Creek Seed Catalogue' as a gift. I was really impressed at their speed of delivery, impressive selection of rare and unusual seeds and free shipping! I published a Blog March 2020 with my selection of seeds. Since then I have grown and tried all of the seeds, some not very easy to start or grow and as one of my clients said, "... these seeds are rare ...and difficult to grow is one reason why." Also this year shipping is no longer free, there is now a set rate charged.

Grown in a sheltered space

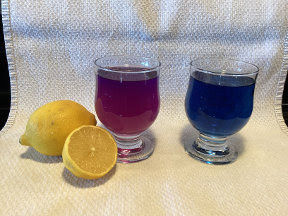
Previous to finding the seeds in this catalogue, I had been unsuccessfully searching for 'Blue Butterfly Pea' flowers for tea and to color food and beverages. When brewed into a tea, it is a beautiful blue color ... add lemon juice and the color transforms in front of your eyes to pink. Desserts, beverages, ice cubes, hard boiled eggs, pasta and rice can also be colored blue with these incredible little flowers. 

Blue Butterfly Pea tea changes color when lemon juice is added

You can purchase the dried flowers online in various forms; teabags, dried whole flowers and powdered. Or grow the plants from seed, save and dry the flowers for special occasions or package and give as gifts to your foodie friends... or use them fresh.

I have seen 2 different methods to color white rice: add the rice and water to a rice cooker and add 3-4 fresh flowers, stir then turn the rice cooker to the 'Cook' position ... or to use dried flowers ... steep the tea, cool; add rice and use the cooled tea instead of water. The steeped, cooled then strained tea method was used to cook this beautiful Blue Thai Jasmine Rice. 

Blue Butterfly Pea Tea used to cook Thai Jasmine Rice
Butterfly Pea is a tropical perennial that can be grown as an annual in cooler climates. It is most commonly started from seed but I found it spotty to germinate even after scarifying the seeds and soaking over night. My efforts and frustration were worth the effort. I was thrilled to grow, collect and dry a small jar of the flowers for my culinary use. The plants prefer full sunlight and will trail freely along the ground or up a trellis or stakes. A beautiful, rewarding gardening and culinary experience!

Until next time ... it sure feels like Spring is in the air, looking forward to garden season!
Bon Appétit!

Photos by Sally Rae 

Sunday, December 13, 2020

New Belgian Callebaut 'Callets'

Bags of Belgian Callebaut 'Callets'
Chocolate plays a large part in most of our holidays. Whether it is Valentines Day hearts, Easter bunnies or eggs, Halloween goodies or Christmas Truffles ... chocolate plays a major role in our gift giving celebrations.

Once a year I make an assortment of handmade Belgian truffles and chocolates. My annual chocolate ritual began in 1990, shortly after moving to Denman Island. We could not find a local chocolatier to our liking, so I started to experiment and develop an assortment of our favorites.

Denman Christmas Craft Faire 2010
Production was too much for just us, so the 'extras' were used for gift giving... and from there demand grew and grew! In 1994 my boxed collection of truffles and chocolates debuted in the Denman Island Christmas Craft Faire and was sold out the first day. I began increasing the size of my recipes and had to buy a small used fridge just for my 'chocolate season'. In 2010, I filmed a small video on YouTube of the Denman Christmas Craft Faire including a glimpse of my chocolates. Back then, I was producing the maximum amount for one person to accomplish while also working in Courtenay, growing a garden and running a household. 

11 pound slabs of Belgian Callebaut
Until this year, I was buying the imported Belgian Callebaut Chocolate in eleven pound slabs from a wholesale distributor in Victoria. Covid has brought many changes to the food supply chain and for some reason my supplier was now selling a different brand, not Callebaut chocolate. In my frantic search for Belgian Callebaut, I found an online Canadian company called Vanilla Food Company where I was able to order and have my Belgian Callebaut delivered. One difference is I am no longer purchasing the chocolate by the slab, they are now in big bags and in 'callet' or chips form. Last year I found these same Callebaut callets at The Bulk Barn in Courtenay of course at a much higher price than buying the large bags. I have not checked if they are available there this year.

from Callebaut 'Callets' to handmade truffles

These callets are a time saver, no more taking the time and energy to break down and chop the chocolate slabs for ganache and dipping. Just scoop from a bag and temper! And it is a little too convenient to scoop a little bowlful for snacking!! Our house smells like chocolate for a shorter period of time these days but those days are cherished. I'm proud of my truffles ... plus the knowledge and experience I've gained over 40 years of working with food as a professional ... and the 30,000+ individual handmade chocolates I've made so far on Denman alone!

I have purchased other professional baking supplies from Vanilla Food Company in the past. If you are looking for a high grade food coloring I would suggest their 'AmeriColor' Soft Gel Paste Food Color. I searched the web for this product and was very happy to find it available through a Canadian company, paid for in Canadian dollars!!

AmeriColor Soft Gel Paste Food Color

It is an easy to use gel format that will not weep, separate or harden. It is able to withstand the freeze/thaw cycle without colors bleeding. It will not break down even the most delicate icings. A very small amount is needed for intense color that will not impart a bitter taste. The bottles are a convenient squeeze, with a re-closable lid. Mix and measure one drop at a time for color that is consistent from batch to batch. They are available as individual colors or in kits of assorted 6-12 colors. 

Here is a basic ganache recipe for chocolate truffles, it is dense and easier for beginners to work with...

Chocolate Truffles      Yield: 40 truffles
The ultimate chocolate indulgence! A truffle filling in its simplest form consists of chocolate and whipping cream... termed 'ganache'. *Tempering chocolate is to heat and cool chocolate to stabilize it for making confections. The chocolate hardens with a smooth, glossy, crisp finish.

1 cup whipping cream
14 oz. top quality dark chocolate, callets or very finely chopped
2 Tbsp. liqueur (for alcohol free truffles use; coffee OR flavored syrups)
1½ lb. dark, milk OR white top quality chocolate for dipping, callets or coarsely chopped
Garnish: crystallized edible flowers, chopped nuts, cocoa powder, threads or swirls of chocolate

In a heavy 2-quart saucepan, scald the cream. Remove from the heat and quickly stir in the finely chopped chocolate until completely melted. (If you are using syrup, add it to the cream before scalding.) Cool 5 minutes stirring once or twice to be sure all the chocolate has melted to a smooth ganache then add the liqueur. Pour into a large bowl and cool to room temperature. Cover and refrigerate overnight.

Line a baking sheet with plastic wrap. Form the ganache into tablespoon sized balls, roll between your palms until round, place on the bake sheet, cover and refrigerate for an hour or overnight until firm. If the ganache is too soft, spoon them out but do not form them, place them in the fridge and then form. 
Special Truffle Assortment

Meanwhile, ‘temper’ the dipping chocolate: Start by chopping the chocolate very finely. Throughout the tempering process, be careful that no moisture gets into or condenses on the chocolate or it will become impossible to work with. Place the chopped chocolate in the top of a dry double boiler over hot, but not simmering water. (NEVER use a microwave for this.)

Stir as it melts. A chopstick or silicone spatula can be used for this process. Heat the chocolate to 104°F. Remove from the bottom of the double boiler. Cover the bottom so the escaping steam does not condense on the chocolate.

Cool to 80°F stirring occasionally. Return the top of the double boiler with chocolate to the bottom and bring the chocolate back up to 89°F. The chocolate is now tempered and ready to use for glazing, drizzling or dipping.

Line a bake sheet with parchment or wax paper. Dip each ball into the tempered chocolate, tap to remove the excess chocolate and to prevent a ‘garden slug foot’. Invert the dipped chocolate onto the lined bake sheet. Allow the dipped truffles to set up or harden without touching or your fingerprints will blemish them.

To garnish; drizzle threads or swirls of different colored chocolate for each variety if you are making multiple flavors so you can tell them apart. If using crystallized flowers or nuts they should be placed while the chocolate is still soft. For cocoa, allow the chocolate to cool completely then roll in cocoa. I use cotton gloves (available from Pharmacies) to handle the chocolates once they are set. Put each chocolate into a 'paper bonbon cup’ and box to store. 

**These truffles can be frozen for up to 3 months. Wrap the box in 2 layers of plastic wrap, then with tin foil. To defrost, remove to the fridge and defrost in the plastic and foil wrapping.

Until next time ... Bon Appétit ... stay healthy, be safe, wear a mask and take good care!

Photos by Sally Rae
Denman Island Craft Faire 2010 Video by Sally Rae
Truffle Recipe by Sally Rae

Saturday, January 18, 2020

'Grain-no-la' Bark

Translation ... "Grain-no-la" is my grain-free, nut based granola that after baking can be broken into chunks like bark or crumbled to resemble traditional granola. 

Avoiding grain can be a difficult task. Most people try to replace or reinvent their favorite grain based recipes with huge disappointment and usually costly experiments. I'm thrilled to report, this grain-free granola got high marks from both Paleo and non-Paleo diet friends and family! I used to like my granola chunky so either way this recipe fits the bill!
Activated nuts and seeds for 'Grain-no-la' recipe
Why use Activated Nuts and Seeds?
Nuts and seeds contain 'phytic acid' and enzyme inhibitors which forces the human digestive system to work overtime causing indigestion and a heavy, bloated feeling in the gut.

The way to reduce phytic acid and enzyme inhibitors is to soak, sprout and/or ferment the nut or seed. Sprouting is the basis of all plant life, concentrating nutrients and unlocking the germ of the seed to reveal its inner life. Soaking and dehydrating nuts and seeds at low temperatures provides superior nutrition and digestibility. 
This bark is a bit delicate, any chunks that crumble can be set aside to have with fruit and yogurt or just eat it out of the bag!!

'GRAIN-NO-LA' BARK   ~(Grain free, Gluten free, Paleo)   Yield: 2 trays bark
This recipe gives instructions to split the mixture into 2 small batches, then once chopped, mix them thoroughly together in a large bowl. You may need to split the mixture into more small batches, depending on the size of your food processor.

Ingredients:
Allow to cool completely on the parchment lined pan
1 egg white, lightly beaten
2 Tbsp. water
2 cups activated walnuts
1 cup activated cashews
1 cup activated almonds
1 cup activated pumpkin seeds, pepitas
1 cup activated sunflower seeds
1 cup unsweetened shredded coconut
3 Tbsp. melted coconut oil, cooled
1/2 cup organic pure maple syrup 
1-1/2 Tbsp. pure vanilla extract
1 tsp. ground cinnamon
1/2 tsp. fine Celtic sea salt 

Instructions: 
  1. Preheat the oven to 300F and line 2 half sheet (13"x18") bake pans with parchment paper.
  2. In a small bowl, whisk together the egg white with water until bubbly and slightly foamy. Add the cooled melted coconut oil, maple syrup and vanilla. Stir to combine.
  3. Into a large bowl, measure 2 cups walnuts, 1 cup cashews, 1 cup almonds, 1/2 cup pumpkin seeds, 1/2 cup sunflower seeds, 1 cup coconut, cinnamon and salt. Mix and put half of the nut and seed mixture plus half of the liquid into a food processor. Pulse until well chopped and combined, but leave the mixture nice and chunky. Dump into a large bowl. Repeat with the other half of the nut and seed mixture and liquid mixture, pulse until chunky. Add to the already processed mixture in large bowl.
  4. To this mixture add the remaining 1/2 cup each whole pumpkin and sunflower seeds. Mix thoroughly using a wooden spoon or your hands with disposable gloves. 
  5. Divide the mixture on the parchment lined bake sheets, spread into an even layer and bake for 20-30 minutes or until golden brown and crispy. Keep an eye on it while baking as it can go from done to burned quickly.
  6.  Remove pans from the oven and allow to sit at least 20 minutes to cool completely. DO NOT stir or break it up until completely cooled.
  7. Use your hands to gently break the bark into chunks
  8. When completely cool, gently break into chunks
  9. Once cool, store the Grain-no-la Bark in a zip type bag in the fridge for up to 2 weeks... if it lasts that long!! 
If you try this recipe, please share your comments below ... Thank you!
Until next time ... Bon Appétit!

Recipe by Sally Rae
Photos by Sally Rae

Sunday, December 1, 2019

Homemade Gifts From Your Kitchen

The thought, time and effort involved in homemade gifts from your kitchen show you care, and are gifted with love. 

One of my favorite standby gifts any time of year, is Caramel Nut Popcorn... it is a much appreciated treat at my house compared to the store bought versions! It can be made with or without nuts... if using nuts try; peanuts, a fancy nut mix or specific nuts that are favorites.
Caramel Nut Popcorn
Cellophane food grade bags can be found at Craft Supply Stores and sometimes Dollar Stores. With the addition of a personalized label and fancy twist tie or ribbon, it makes a thoughtful parting gift to dinner guests, stocking stuffer or ... package the whole recipe in a one gallon fancy container for that 'big kid' in your household! (No names mentioned!!) With 14 cups of popcorn and nuts, this recipe makes quite a few small gift bags, so it goes a long way.

At the other end of the homemade 'foodie gift' spectrum is the elegant French Macaron. Make these sweet little gems for a very special gift. They are time consuming and a bit fussy but oh so elegant! 
Elegant French Macarons


Hand dipped Chocolate Truffles
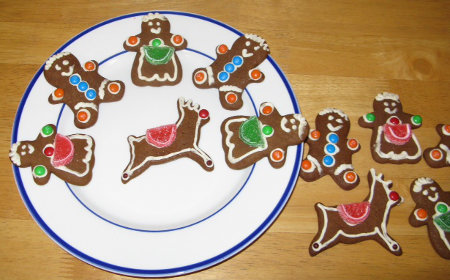
Gingerbread Boys, Girls and Reindeer
For a quick, easy and decadent gift try Chocolate Nut Bark for the chocoholics on your list. Chocolate Bark satisfies the cravings without the time and labor intensity involved in making hand dipped Chocolate Truffles.

If you are an avid baker, a fancy assortment of festive cookies and squares packaged in a pretty tin make a tasty, caring gift. 

Asst. Pickles and Pickled Quail Eggs
On the savory side, small jars of homemade fermented pickles, pickled eggs (think tiny quail or Bantam hen eggs) or even sauerkraut are great gifts but please be sure the recipient knows these gifts must be kept in the fridge at all times!! 

If you are a gardener, gift a small braid of your home grown garlic adorned with dried herbs or flowers and a pretty ribbon. Or an assortment of fruit jams, vinaigrette or condiments prepared from your garden produce.
How about a fancy bottle of Homemade Liqueur ... or my cookbook 'For the Love of Food'? There are links to my Blog recipes offered on most of these suggestions above, just hover over them and click.

I hope these suggestions have your creative juices flowing. To get you started, a recipe from my cookbook 'For the Love of Food', enjoy my Caramel Nut Popcorn!

CARAMEL NUT POPCORN           Yield:  About 14 cups
Fill colorful tins or cellophane bags with this treat for an inexpensive holiday gift that both kids and adults will enjoy receiving.

12 cups popped popcorn
2 cups mixed nuts or peanuts
1 cup packed brown sugar
½ cup corn syrup
½ cup butter
½ tsp. sea salt
½ tsp. pure vanilla extract
½ tsp. baking soda
Without stirring, boil 5 minutes

Spray a large roasting pan with non-stick cooking spray. Combine popcorn and nuts in pan; place in a 250°F oven while preparing the glaze. In a saucepan combine brown sugar, corn syrup, butter and salt. Stirring constantly bring to a boil over medium heat. Without stirring, boil 5 minutes.

 
Break apart and cool on bake sheets
Remove from heat, stir in vanilla and baking soda. Pour over popcorn and nuts; stir to coat well. Place in pre-heated oven 60 minutes, stirring occasionally (every 20 minutes works well).

When done, remove from the oven and divide the mixture onto 2 non-stick bake sheets with sides. Quickly break apart or into chunks while warm. Allow to cool. Store in tightly covered container. 

Until next time... Have fun in your kitchen ... and Bon Appétit! 

Photos by Sally Rae 
Recipes by Sally Rae