Saturday, January 21, 2017

Chinese New Year

Chinese New Year, also known as Spring Festival in China is the most important traditional holiday in China. The date for Chinese New Year changes each year, although it always falls between January 21st and February 20th. This year, January 28th begins the Year of the Rooster on the Chinese Calendar.

In the recipe below, Sambal Oelek is a chunky, ground, chili paste with no other flavors added. This provides the simple, pure taste of chilies. It does pack some heat, so add slowly and adjust to your taste. Sambal Oelek can be found in import shops, at Runge's Delicatessen in Courtenay and some grocery stores in the import aisle. For a substitute, try Sriracha, it is slightly sweeter with a touch of garlic but they are comparable in 'chili heat'. The other difference is the Sriracha is smooth and Sambal Oelek is a chunkier paste.

Indonesian Spring Rolls                  Yield: 24 small Spring Rolls 
For this recipe, use the small, 6-1/2" diameter rice papers, sometimes called Spring Roll Wrappers. These rolls should be prepared no more than 4 hours ahead of cooking. Store them covered in the fridge. They can also be frozen, uncooked, for up to 2 months.

24 dried rice paper wrappers (6-1/2" diameter)
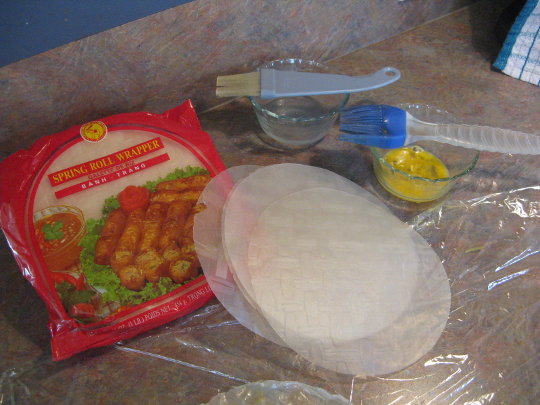
Small, rice paper (Spring Roll) wrappers...
Brush one side with water the other side with egg.
1 egg, lightly beaten
water
2 pastry brushes
oil for deep frying

Filling: 
1 Tbsp. sesame oil
6 medium, dried shiitake mushrooms
2 carrots, cut into 1/2" long julienne strips
1/2 small suey choy (Chinese cabbage), finely shredded 
1 medium onion, cut into julienne strips 
1 clove garlic, minced 
1 Tbsp. cornstarch 
3/4 tsp. Sambal Oelek, or to taste
1 egg, beaten

Dipping Sauce: 
2 Tbsp. demerara sugar
2 Tbsp. rice vinegar
2 tsp. grated fresh ginger root
1-1/2 tsp. Sambal Oelek

Place dry shiitake mushrooms in a medium bowl and cover them with hot water. Cover the bowl and set it aside for 20 minutes. When the mushrooms have softened slightly, strain the liquid through a coffee filter or several layers of cheesecloth. Reserve 2 Tbsp. mushroom liquid for later in the recipe and the rest for stock, sauces, or discard. Remove the mushroom stems and discard. Cut the caps into thin julienne strips and set aside.
Assembly Step #1
Heat sesame oil in a large skillet. Add the onion and saute until soft, add the garlic and saute until the onion is golden but don't burn the garlic. Add the julienne cut shiitake mushrooms, carrots and shredded cabbage and the 2 Tbsp. reserved mushroom liquid. Stir fry the veg over medium-high heat, just until they are still crispy. Sprinkle over the cornstarch and mix in gently. Remove the skillet from the heat, add sambals, egg and mix well. Transfer mixture to a bowl and refrigerate until cool.
Assembly Step #2
While the filling cools, make the dipping sauce. Measure all ingredients into a small glass or plastic jar with a tight fitting lid. Cover the jar, shake vigorously and set aside. 
Preheat the oil for deep frying to 350F to 375F.

To assemble the Spring Rolls: 
Step #1- cover a clean work surface with plastic wrap. Place rice paper, on the plastic wrap and brush one side lightly with water, then turn the rice paper over and brush the other side with beaten egg. Let stand just until the rice paper softens. Place one tablespoon of cooled filling on each rice paper and fold over to just cover the filling. 
Assembly Step #3
Step #2- Fold the sides in and continue to roll up snugly. 
Deep fry until lightly browned
Step #3- Continue filling and rolling until all ingredients are used. Place finished rolls between layers of plastic wrap on a bakesheet. Cover with plastic wrap and a damp, not wet, cloth. 

Deep fry in preheated oil for about 3 minutes or until lightly browned. Drain on paper towels. Serve hot with dipping sauce. 

*CHEF'S NOTE: You can prepare and deep fry these rolls up to 6 hours prior to serving. Cool completely and cover them with plastic wrap. Store in the fridge until serving time. To serve, place in a preheated 375F oven for about 8-10 minutes or until hot throughout.
 
Indonesian Spring Rolls with Dipping Sauce

Till next time Kung Hei Fat Choi and Bon Appétit!

Recipe and Photos by Sally Rae

Sunday, January 15, 2017

Instant Pot

A few of my friends have been raving about their electric pressure cooker, 'Instant Pot'. Having never heard of it, I did some research. I had 2 small appliances that needed to be replaced and this would replace both, with the added bonus of a stainless steel inner pot rather than a non-stick coating. So, Instant Pot went on my wish list to Santa this Christmas. 
Instant Pot IP-LUX60
Instant Pot is advertised as "the next generation Electric Pressure Cooker designed by Canadians specifically for North American consumers." I have the Instant Pot IP-LUX60 which is a 6-in-1 programmable cooker combining the functions of a pressure cooker, sauté/browning, slow cooker, rice cooker, steamer and warmer. Some of the great features are 3 temperatures in Sauté for browning or thickening, and 3 temperatures in Slow Cook to complete the tasks of a common slow cooker. The stainless steel inner pot leaves no health concerns of non-stick coating residual. A Steaming Rack, Soup Ladle, Rice Paddle, Measure Cup, Instructions, Recipe and Cooking time table in several languages are included.

IP-LUX60 - What comes in the box...
All the instructions can be a bit intimidating. I suggested to a few newbies, just put in a few cups of water and run it through a test.
I make big batches of soup, turkey chili etc. for the freezer that I use for lunch when I work ...or otherwise need a quick meal. They are labelled and frozen in 2 cup yogurt containers. Photos of my freezer soups can be found on my post 'Freezer Meals' from last November. These are an easy meal with the microwave to defrost and heat for lunch BUT..... Mom does not have a microwave and she now has an Instant Pot!!

Today I took a Spicy Sausage and Kale Soup, (frozen lump) directly from the freezer to test. Here is what I did and the results...

- Pour in 40ml of water, or enough to cover the base of the stainless steel inner pot
- Remove the frozen item from packaging and place the lump into the pot already coated with water
- Lock in the lid and move the steam releasing handle to 'sealing'
- Press 'Manual' then press the minus sign (-) to program for 15 minutes
- When the cooking time is complete ...you can do a quick release by moving the steam release handle to the 'venting' position OR allow it to do a natural release and let it go to keep warm if you are busy

...I used the quick release method and there was still a small frozen ball from the center. I broke it up and put the lid back down for a few minutes and it was hot and ready. For bigger blocks I would suggest the natural release method, or adding a few more minutes to the original time.


The
little soup ladle that comes with Instant Pot, fits perfectly to the inside pot to spoon out all the hot liquid. This is only the second try with my new Instant Pot and I have already moved the slow cooker and my rice cooker out of the kitchen!! 

Another way to defrost food is to do a pot in pot where you put your frozen food in a pot that fits inside the Instant Pot. Then add water to the Instant Pot, then the steam rack and then the pot with the frozen food.
I love how fast and easy it is to use and the clean up is fast and simple... watch for more of my Instant Pot success stories and recipes in the future!

Till next time... Happy New Year and Bon Appétit!


Photos by Sally Rae

Tuesday, December 20, 2016

Green Peppercorns ~ Poivre Vert

'Madagascar Green Peppercorns' by Moulin
'Green Peppercorns' are the unripe berries of a tropical, flowering, vine plant, Piper Nigrum. Because they are perishable, they are usually freeze dried, preserved in brine or pickled in vinegar. The harvested green peppercorns are packed in brine, vinegar, or salt soon after they're picked. They are mild and soft and can be eaten whole. In dried form, they don't last very long and must be used quickly.

They are true, unripe, black peppercorns, the same berries are processed to make black pepper. Green peppercorns have a milder, much suppressed pepper flavor but are more complex and fresh flavored than their black counterparts. In their various preserved forms, green peppercorns are popular in French, Thai, and other Southeast Asian cuisines.

Not all brands have the same quality and texture. I have found some packed in small glass jars, sold in grocery stores, that have a firm texture and unpleasant mouth feel. My preferred brand is in the photo, called 'Madagascar Green Peppercorns' by Moulin, a product of France. They are found in tins, available in 2 sizes; 71ml and 212ml. These small tins are a great stocking stuffer for foodie friends and family. They are delicious added to sauces and gravies for meatloaf, tourtierre, roast meats or turkey. To use them in my Gluten-Free Gravy recipe; after whisking in the brown rice flour and simmering for 15-20 minutes, strain the gravy, add the drained green peppercorns then serve immediately. Discard the brine -- do not cook the gravy after the green peppercorns are added.
Gluten-Free Green Peppercorn Gravy, Braised Red
  Cabbage, Steamed Broccoli, Hasselback Sweet Potato

You can find 'Madagascar Green Peppercorns by Moulin' at Runge's Imports and Delicatessen, 347-4th Street, Courtenay.  

There is no substitute for green peppercorns in brine. A substitute for dried green peppercorns are pink peppercorns which aren't true peppercorns, but they have a very mild, peppery flavor.

Till next time... thank you for your support and encouraging comments!
Season's Greetings, Merry Christmas, Happy New Year and Bon Appétit! 

Photos by Sally Rae

Saturday, December 17, 2016

Winter Veg with Fruity Vinaigrette

Another traditional side dish for the holidays is winter squash, in various preparation... baked, mashed, roasted etc. The braised recipe below with added kale, mushrooms and a fruity vinaigrette is a colorful addition for your Christmas Dinner Menu. It is a hearty, almost zero mile dish with winter squash stored from your summer garden harvest and fresh kale from the winter garden.  
As for harvesting your winter kale... the hardy leaves of kale will freeze solid in temperatures of -5C. If the leaves are frozen solid, wait until the weather has warmed up and the leaves have thawed out before you harvest. When it is safe to harvest, pick the outer leaves first. They are less hardy than the younger leaves in the center of the plant.

For variety of the fruit vinaigrette, there are a few local Oil and Vinegar Tasting rooms in the Comox Valley. If you have not tried this new specialty, go with a few girlfriends and guaranteed you will leave with some new favorite flavors and a few Christmas gifts for the foodies on your list. I have gathered a good selection from 'Signature Oil and Vinegar' near the new Thrifty Foods. My favorite two Olive Oils are: Butter and Whole Fruit Lemon. As for the vinegar; I can't live without Blackberry-Ginger Dark Balsamic, and the White Balsamic Cranberry Pear and White Balsamic Coconut are good enough to drink! The helpful staff will guide you through tasting and choosing flavors that appeal to individual taste, usage and preference. I started with 8 different flavors in 60ml bottles and graduated to purchasing the 200ml size of my favorites. 
'Signature Oil and Vinegar' is now located in the Crown Isle Shopping Centre at 207B - 444 Lerwick Road Courtenay and Tyee Plaza, Shoppers Row in Campbell River.
My current collection from 'Signature Oil and Vinegar'
WINTER VEG WITH FRUITY VINAIGRETTE       Yield: 3-4 servings 
There is a wide variety of fruit infused vinegar and oils available. Substitute your favorites in the vinaigrette.
The Fruity Vinaigrette:
2 1/2 Tbsp. seedless raspberry or blackberry jam
2 Tbsp. Raspberry or Blackberry-Ginger Dark Balsamic vinegar (or red wine vinegar)
2 tsp. Dijon mustard
2-3 Tbsp. Whole Fruit Lemon Olive Oil (or extra-virgin olive oil)
1/4 tsp. granulated garlic
Sea salt
Freshly ground pepper

Whisk together the jam, vinegar and mustard until smooth. Add olive oil, garlic, salt and pepper, whisk again. Taste and adjust seasoning. Refrigerate in a jar, stir before using. This can be made a few days ahead of time.

The Veg:
6 large, organic, crimini mushrooms -cleaned and cut into chunks
1 medium white onion -large dice
3-4 Tbsp. butter or Butter Olive Oil (or extra-virgin olive oil) -divided
3 cups peeled -cubed Ambercup or Buttercup squash
A bunch of fresh garden kale
1/2 cup whole, roasted pecans

Strip the kale leaves off the stems and slice into strips about 1/2 inch wide, set aside. Chop the kale stems into 1/2 inch long bits, keep separate from the leaves.
In a medium sauté pan, melt half of the butter, add diced onion and mushrooms. Sauté over medium heat until lightly browned, remove from the pan and set aside. 

Melt the remaining butter in the pan and add the squash cubes and kale stems. Quickly brown the squash lightly, turn the heat to medium/low, add the kale leaves, cover the pan and braise for about 8 minutes or until the squash is cooked through but not mushy. Check it every few minutes. Add the cooked mushroom mixture and drizzle with about half to two thirds of the vinaigrette. Mix and taste, add more dressing for desired flavor. Serve the remaining vinaigrette on the side. Sprinkle with pecans. Serve warm immediately. 

Till next time... Bon Appétit!

Recipe and Photo by Sally Rae

Sunday, December 11, 2016

Hasselback Sweet Potatoes

Sweet Potatoes are a traditional side dish for Thanksgiving and Christmas. In a previous Blog, 'Sweet Potato or Yam?', I wrote about the different colors of these tubers and history of the term 'yam'. I have added a new 'Label' for 'Sweet Potato' to my Blog. Click on the label for a quick reference... from recipes all the way to DIY slips and information on growing them.

Hasselback potatoes are commonly prepared using white fleshed potatoes. For anyone avoiding the nightshade family this is a delicious substitute. You may even find you prefer this easy, sweet and crispy version instead!

Use 2 wooden spoon handles

Use the dark orange flesh variety of sweet potato. They remain moist and sweet when baked. 
If you are not confident in your knife skills, use either two chop sticks or the handles of two wooden spoons to prevent slicing completely through. I have heard specialty kitchen shops sell a gadget for cutting hasselback potatoes but these methods will work just fine. 

HASSELBACK SWEET POTATOES
Sweet and moist on the inside and crispy on the outside. These sweet potatoes are the perfect side to serve at any festive occasion!

4 medium sweet potatoes
1-1/2 Tbsp. unsalted butter, melted
2 tsp. olive oil
1 tsp. minced fresh thyme 
1/2 tsp. granulated garlic
1/4 tsp. sea salt

1/4 tsp. freshly ground black pepper 
 
Preheat the oven to 425 F. Line a baking sheet with aluminum foil. Make a series of 1/8-inch slices along each potato, slicing 2/3 of the way through. (*See notes above using wooden spoon handles or chop sticks as a guide.)
Stir together the melted butter, oil, thyme, garlic, salt and pepper in a small bowl. Rub the potatoes all over with the mixture, getting in between the slices.
Place on the baking sheet and roast until the center of the potatoes are tender and the outside is crisp, 50 minutes to 1 hour. 

Halfway through the roasting time, remove the potatoes from the oven and run a fork gently across the tops of the potatoes, using light pressure, to fan the slices and separate them from one another. 

Till next time... Bon Appétit!


Roasted Hasselback Sweet Potato

Photos and Recipe by Sally Rae