Sunday, November 27, 2016

Gluten-Free, Fat-Free Gravy

Brown Rice Flour
There is an easy, gluten-free solution to making a silky, thick gravy ... brown rice flour! What's even more attractive is it can also be fat free.  

Wheat flour is commonly used to thicken soups, sauces and gravies by incorporating in the form of a roux (flour and fat) or a slurry (flour and a liquid). With the increased attitude towards wheat and avoiding it, substitutes don't always deliver a satisfactory result. Not so with thickening soups, sauces and gravy using Brown Rice Flour. Holiday turkey dinners at my house are always accompanied by a large, 4 liter  pot of brown rice flour thickened gravy. After the meal when I reveal my 'secret', not one guest has ever said they could tell something was different.

Unlike wheat flour or starches, brown rice flour is incorporated into boiling liquid a little at a time with constant whisking. Once incorporated, the gravy, soup or sauce must be moved to a low heat burner and simmered, partially covered for 15-20 minutes... stir or whisk occasionally. This cooks off the 'grainy' texture, characteristic of rice flour. Strain to remove any lumps. Rice flour, especially when used in larger amounts, dilutes seasoning. It is a good habit to always taste and adjust your seasoning before serving.

Brown Rice Flour can be found in bulk at 'The Bulk Barn' and most grocery stores packaged under the 'Bob's Red Mill' brand. Also found in larger packages at 'Edible Island', 'Naked Naturals' and all health food stores. 


GLUTEN-FREE GRAVY 
Brown rice flour is a gluten-free alternative to thickening gravy with roux. For a fat-free version, skim and remove all fat from the stock and pan drippings. It is important to simmer the gravy for 15-20 minutes after the addition of the rice flour, to cook off the ‘grainy’ texture.  

1 cup flavorful chicken stock 
Pan drippings 
3 to 4 Tbsp. brown rice flour 
Seasonings... granulated garlic, minced herbs, freshly ground pepper, sea salt, Worcestershire sauce, bouillon powder or cubes, tamari etc.

Deglaze the roasting pan with some of the stock. Strain into a small saucepan, add the remaining stock and desired seasonings. For fat-free gravy, skim and remove all fat from the stock and drippings then bring to a rolling boil. With a wire whisk, add brown rice flour slowly, while whisking vigorously. If you want thicker gravy, add a little more rice flour in the same manner. 
Move the pot to another burner set to low heat, partially cover and allow to just simmer slowly for 15-20 minutes, stir occasionally. Taste and adjust seasonings. Strain and serve. 

**CHEF'S NOTE: to thicken soups, gravies and other sauces; use a ratio of 2-3 Tbsp. per cup of liquid. Unlike other thickeners, the liquid will thicken while whisking in the rice flour. Stop adding when you feel your soup is thick enough. If after simmering, if the soup is too thick, use more stock to bring it to the proper consistency. With experience, you will become accustom to the ratio required to achieve consistency you prefer. 

Till next time... Bon Appétit!

Recipe and Photo by Sally Rae

Wednesday, November 9, 2016

Freezer Meals

I came home with a 'bug' that took the wind out of my sails and over a month later, I'm
still struggling with a cough and low energy. Through this I managed to plant and mulch the garlic for next summer. Also cut down and mulch the two boxes of strawberry plants with straw, which brings the garden close to closure for this year. 
Filling the upright freezer for winter
I am feeling behind with preparation for the season but managed to get a few big pots of soup made for the freezer. I have two freezers, a chest for raw meat, fish and poultry and an upright for fruit, baking and prepared foods. It also holds the ice packs for when we do a grocery shop off Island. Although the upright freezer is not as efficient in a power outage, the ice packs help retain some temperature.

I love the upright freezer, it's like a grocery store of my home made, ready to heat and eat meals... like pre-cooked shepherds pie, lasagna, sauces, soups etc. The other benefit is that the shelves help to actually find what you are looking for without too much digging around. 
Garlic Scape and Basil Pesto~2oz bags
Roasted Tomato Sauce~12oz and 8oz bags
Roasted Tomato Sauce and several flavors of Pesto are both frozen in zip type bags. The sauces are prepared, cooled then measured into bags that are marked with the date, amount and frozen flat on bake sheets. Once frozen, the flat bags stand neatly in shoe boxes on the top shelf. The soups are packed in single serving, 2 cup containers and easily stack three cartons high.

Many of my freezer soups have no recipe, just a list of ingredients and a few guideline instructions. For those who are comfortable with the knowledge of flavors, consistency and texture... and cooking without measuring and without a recipe, this is an easy task. For those who need a bit more guidance, I have given some measures below. Here is my favorite freezer soup...

Spicy Sausage and Kale Soup
This is my favorite, fast soup. Spicy Italian sausage has enough seasoning that very little adjusting is necessary. I like to serve it with a dollop of Greek yogurt or sour cream.
 
6-8 Spicy Italian sausages
1 onion, diced
3-4 quarts flavorful chicken stock
brown rice flour or roux, for thickening
a bunch of kale; washed, stems removed and chopped

Remove sausage meat from casing and fry in oil; breaking into small, bite sized pieces. Add diced onion and fry until lightly browned. Remove from heat, drain excess fat and set aside. Meanwhile, heat and thicken chicken stock to desired thickness. Add cooked sausage mixture and chopped kale to thickened stock. Bring to a simmer, stirring occasionally, taste and adjust seasoning.

Till next time... Bon Appétit!

Photos by Sally Rae
Recipe by Sally Rae

Saturday, October 8, 2016

Start Your Own Sweet Potato Slips

The 'sweet potato' is an easy to grow, heat and drought tolerant vegetable of tropical origin. Sweet potatoes are grown from 'slips' which are sprouts that are grown from stored sweet potatoes. In the spring, you can buy slips from local garden centers ready to plant. However, if you're looking for a DIY method, it's the right time of year to prepare starting your own slips to plant next spring.
Leaf and flower of red skinned, orange flesh sweet potato

According to the 'Old Farmer's Almanac'; "November is when the best of the new harvest is in grocery stores. To start your own slips for next spring; purchase new harvest, unblemished, medium sized sweet potatoes. One potato should yield about 12 plants. Store these potatoes in a well lit room with a temperature of 18-21C (65-70F.) Keep them there until 90 days before the last Spring frost date. They will then need to be planted in soil and kept continuously warm and moist for another 90 days. To do this, use a 1-1/2 gallon pot for every 2 potatoes. Poke drainage holes in the bottom and fill with 3 inches of mulch followed by potting soil. Plant the potatoes in the pot at a 45 degree angle so the sprouts will grow above the soil. When the slips are 6-12 inches tall you can plant them outdoors providing there is no danger of frost or move them to a greenhouse."
White skinned and flesh sweet potato

This summer was my first experience growing sweet potatoes. Each slip was transplanted to a large pot in the portable greenhouse. The vines and flowers were an attractive addition to the greenhouse and received many comments. The red skinned, orange flesh sweet potato leaf had three points, see top photo. The white skin and flesh potato had more of a heart shaped leaf, see photo on right. Both varieties had the same beautiful purple flower.  
Red skin, orange flesh sweet potato

To harvest, I dumped each pot into a wheel barrow. The root system of the white skinned variety was very heavy with few tubers. The root system of red skinned was much less but more tubers, although small. Interesting, the largest white sweet potato came from a slightly smaller sized container.

In the photo of my meager 'harvest' below right; the white skinned sweet potatoes on the left were from the smaller sized pot. The red skinned and white to the right were both planted in the same sized, larger containers.
I was pretty excited with the amount of red skinned sweet potatoes, my preferred variety, but was disappointed with how small they were.
With no idea of what to expect, I was hoping for larger tubers but will certainly experiment more next year... maybe in the garden instead of containers? ...under a plastic tunnel to keep in the heat?? In the meantime, I will gather a few good candidates for my DIY slips for next Spring.

I have covered the topic of Sweet Potatoes in three previous posts. This past May featured a favorite recipe for 'Sweet Potato Salad' and in Sweet Potato or Yam, January 2015 a delicious 'Curried Sweet Potato Soup' recipe. The price of sweet potatoes has dropped dramatically for Thanksgiving, so if you have yet to try these two recipes, now's the time! And don't forget the pooch! The humongous sweet potatoes dehydrate to the perfect size for doggie treats, another sweet potato method from 'Going to the Dogs'.

Till next time... Happy Thanksgiving and Bon Appétit!

Photos by Sally Rae

Tuesday, September 13, 2016

Fall Clean Up

Tree Frogs ~ summer residents in the portable greenhouse
The forecast predicts we have a few more warm, sunny days before the rain appears. Some of my least favorite garden jobs are rolling up muddy garden hoses in the rain and cleaning out the big plants. When the squash plants are slippery, slimy and wet, it's a dirty, unpleasant job wrestling them to the compost. 

I'm thrilled to say all my garden hoses were drained, dry, rolled up and in the shed through the beautiful warm sunshine this week. The portable greenhouse was dry, dismantled, neatly folded and tucked in the shed in a very orderly fashion. The greenhouse resident five tree frogs were relocated in the surrounding area to the sweet potato plants that I have yet to harvest. 

Butternut and Buttercup Squash
I pulled the roots of the winter squash last week so the plants could die down. In cooler climates, the frost does this, but uprooting them is my experiment this fall. If anyone else has tried this I'd be happy to hear your experience. I cut off the Sunshine, Buttercup, Butternut and Red Kuri squash yesterday and let them have a bit of sun to dry off the skins that sat on the ground. They are now undercover on an outside deck, until the cooler weather kicks in. Some of the summer squash has already been pulled out but I left 3 plants for the fresh,
mini zucchini and patty pans that I adore. I may regret this decision and I can get them from Sam and Emily at the Denman Saturday Market, so we'll see how long they last.

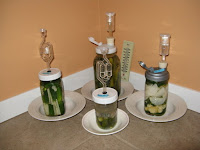
Single jar fermentation of vegetables
I have also delayed pulling up the six Corentine Cucumber plants. They were amazing this summer, producing about one and a half pounds every 6 days. I had a very busy time with the Perfect Pickler and at one point had 4 jars fermenting at the same time! More on that topic later, that will include my new lids with air locks used for single jar fermentation of assorted vegetables; cucumbers, daikon radish, cauliflower, kohlrabi and carrots. I have allowed the last three pickings of the cukes to grow larger, for sliced sweet pickles. Each picking gave me one recipe of my 'Aunt Stella's Pickles-in-a-Pail' from page 227 of my cookbook, 'For the Love of Food'. All these pickles require storage under refrigeration ... my fridge capacity is near its limit! 

If you have followed my strawberry obsession, I always complain about the June crop. Small berries, small yield and fighting the bugs and birds. I had an idea this week to prune off all the flowers and small green berries. Yes, they were covered in flowers and I noticed several days after pruning there are more flowers opening that I missed! My reasoning is 'why have them put all that energy into flowers and berries that will never ripen?' Hoping if I prune the plants early that their energy will produce a better June crop. I will have to wait and see. But, in the meantime, this warm sunny weather has produced several heavy pickings of huge, sweet, juicy strawberries. I am in heaven!!
September Seascape Strawberries ... amazing!!
Hope this inspires the gardeners out there to get your fall clean up done while the weather is beautiful .... the fall storm season is lurking just around the corner!

Till next time ... Happy Gardening and Bon Appétit!

Photos by Sally Rae

Sunday, August 28, 2016

Say Goodbye To Summer

With record breaking temperatures in the mid +30C range just days ago, it was as if Mother Nature flipped the switch today. With wind, rain and temperatures cooler than our gorgeous, warm evenings just last week, it seems summer has come to an end.
Yellow Shoulder on Oxheart Tomatoes

I must admit, watering by hand was becoming a chore, so I am happy to start pulling and pruning plants. Several weeks ago the tomatoes were pruned, removing small fruit that would never ripen. The hot weather wreaked havoc with all my tomato varieties. Our unusually hot spring caused low pollination, now I am struggling with green and yellow shoulder. Although it is safe to eat the 'good part' of the tomato, both problems are weather related.
Sweet Potato vine in bloom

This year I have 3 sweet potato vines in the greenhouse. It is my first attempt at growing them, so there will be more info about them when I harvest. In the meantime, both the flowers and vine are beautiful!
  
Sunshine Squash
I cut back the winter squash vines, leaving two or three leaves past the good sized squash on each vine. Like pruning the tomatoes, I would rather the plant put its energy into the larger fruits rather than struggle trying to produce more this late in the season. Near the bottom left corner of the photo; notice the brown, shriveled vine where it was cut several weeks ago... three leaves past the maturing squash.  

Seascape Strawberries ripening
The June crop of Seascape Strawberries was minimal with small berries, and half of the new bed planted last year had died over winter. Concerned that the plants were too small and weak, I gave each a third cup of the fertilizer mix I discussed last Spring. As expected, August brought the second crop in abundance and some huge specimens I'm sure due to the extra boost of food. If the weather remains dry, the crop will continue through the end of September.

Kale transplants with shade trays
'Volunteer' kale plants were moved to a winter bed location and shaded with perforated trays in the heat. Heavily mulched with straw and watered daily, they have survived the heat. With the overcast, cool, damp weather it is safe to remove the shade trays.

Dessert King Figs
My Dessert King fig produced its largest crop to date. Pinching some of the buds in the spring increased the yield to 74 figs on my small tree. It is amazing to look back three months when the fruit were just tiny nibs. I will continue this method in future years as it has been very successful. I still check the tree when passing by, longing for more of the luscious, ripe fruit.   

Corentine Pickling Cucumbers
The Corentine pickling cucumber plants were fabulous, a new favorite and I would highly recommend them. With daily watering in the heat, seven plants produced easily over a pound every 5 days. Most were brine pickled in the Perfect Pickler, single batch, jar fermenting process. The few that got missed under a leaf and grew to a small monster were still sweet and crunchy for sandwiches, salad or sliced and eaten fresh. 
Tree Frogs in the greenhouse


It is bitter sweet to say goodbye to another summer in paradise. With the next few weeks of forecast lower temperatures and rain, it is time to put the garden and greenhouse to bed until next spring.

Till next time... stay dry and Bon Appétit!


Photos by Sally Rae