Sunday, August 14, 2016

Zucchini Rant

It is a known fact on Denman Island to never leave the windows of your unattended vehicle down during zucchini season; you will have bags of them left on the seat when you return!   *Excerpt from 'Zucchini Madness' in my cookbook, 'For the Love of Food' 

Every year I hear complaints from home gardeners about growing zucchini; 'there is just too much', 'what to do with the monster found lurking', 'they have no flavor' .... 'I can't even give them away!!' And every year I try to educate folks about how to harvest and truly enjoy these delicious, tender gems. 

Sam and Emily of 'Two Roads Farm' harvest zucchini at their gourmet prime. They harvest and sell baskets of tiny, assorted summer squash at the Denman Island Saturday Market. I overheard a woman at their tent exclaim that "all these years she was growing them wrong". In fact, she was probably growing them right... just harvesting them wrong!
The secret... pick them young! The 'big' yellow zucchini above is 4" long!
The very best zucchinis to eat are 3-4 inches long. Being young, tender and crisp, you can do almost anything with them. All gardeners know by the end of the season, or during late summer clean up, inevitably the frighteningly out-sized, monster zucchini will appear. Many simply compost these specimens, others bravely soldier on with zucchini loaf, zucchini pickles, zucchini chocolate cake and heaven knows what other concoctions. My favorite options; cut them in half and place them outside the garden gate for the deer... chickens also love them this way. 


Summer squash cooked fresh from the garden are sweeter and more delicious than those found in grocery stores. They can be quickly rinsed to get rid of soil or dust but must never see water again. Picked in their infancy, they need only be tossed with some butter in a fry pan for several minutes over a medium heat to bring out their best. For the BBQ you will need to pick them a little larger, about 6-8" long, to slice in half or thirds.

GRILLED ZUCCHINI WITH LEMON MARINADE       Yield: 6 servings 
This is a favorite of mine; try it at your next cook out. 

6 Tbsp. (1½ -2 lemons) fresh squeezed lemon juice 
6 Tbsp. olive oil 
2 Tbsp. finely minced white onion 
2 cloves garlic, minced 
1 Tbsp. fresh thyme leaves, minced 
½ tsp. sea salt 
½ tsp. black pepper 
Several dashes of Tabasco Sauce 
6 small zucchini (6-8 inches long) halved lengthwise 

Shake the marinade ingredients together in a jar. Let sit 20 minutes. In a shallow pan, arrange the zucchini in a single layer and cover with the marinade. Allow to sit for 2 hours, turn and baste occasionally with the marinade. 
Prior to lighting the barbecue, brush or spray the grill with a light coat of vegetable oil. Preheat the barbecue to medium-high. Grill zucchini cut-side down for 4 minutes. Flip over and baste with remaining marinade. Continue to grill until tender, about 10-12 minutes total.  

Till next time, Happy Gardening and Bon Appétit!


Photo by Sally Rae ~ Baby Zucchini and Patty Pan from Sally Rae's garden
Recipe from 'For the Love of Food' by Sally Rae
 

Tuesday, August 2, 2016

Big Bowls of Beautiful Berries!

Big, sweet and juicy ... Seascape Strawberries
 from Windhover Farm
In celebration of summer, I set out for my annual ritual of strawberry picking, at Windhover Farm on Dove Creek Road.  http://comoxvalleyberries.com
It's always a pleasure to catch up with Andrea and it never feels that a year has passed us by!

Today was an impromptu trip. Waking up to an overcast sky, a slight breeze and cooler temperatures ... perfect weather for a few hours in the field. These beauties will be enjoyed fresh for a few days and the rest frozen for winter; destined for breakfast smoothies and possibly a batch of Strawberry/Blackberry Jam.
 
This is my third year picking summer strawberries at Windhover Farm. For some reason the June berries come and go, and I miss the window every year. Not to worry, the Seascape plants in my garden produce a far more impressive crop in the summer and early fall. The Burch Family farm grows my favorite variety, Seascape, along with Tristar and a few others. The blueberries and raspberries are all but finished but the strawberries are getting their second wind, are plentiful and easy to pick. Enough chatter... I have 18 pounds of strawberries waiting for me!!
Thanks Andrea, Happy gardening and see you next year!

Till next time... Bon Appetit!

Photo and strawberry picking by Sally Rae 

Thursday, July 28, 2016

Angel Cake ...from Scratch

'Angel Food Cake' or Angel Cake is tender, light, airy and virtually fat free! Homemade Angel Cake is worth the work but a tube pan with removable bottom is highly recommended. To create the light, airy texture, two baking techniques are used; sifting the dry ingredients numerous times to incorporate extra air and whipping the whites to a meringue. This delicate cake pairs well with berries and is a favorite of mine for summer entertaining.
Because this cake is made with only the egg white, there are a few ways around the dilemma of 'what to do with all those egg yolks'. You can purchase 'egg whites only' in the dairy section of grocery stores and measure 1-3/4 cups instead of 12 egg whites. I have used up to 2 cups egg white, adjusting nothing else in the recipe and the cake works out fine. I freeze egg whites for use later when making recipes that require only the egg yolk. Freeze 6 egg whites in each container, so it is measured and ready to bake with. Be very careful when separating eggs that absolutely NO egg yolk or fat of any kind gets into the egg whites or they will not whip properly. To use the frozen egg whites; defrost in the refrigerator, bring to room temperature when ready to start baking and follow the recipe below.

TRADITIONAL ANGEL FOOD CAKE            Yield: 8-10 servings
You can purchase 'egg whites only' in the dairy section of grocery stores, use 1-3/4 to 2 cups for the recipe below. Do not skip any of the sifting; it incorporates extra air needed for a perfect, light Angel Cake.
 

12 fresh egg whites, at room temperature 
Loosen the cake ONLY when completely cool

¾ tsp. sea salt 
1½ tsp. cream of tartar 
1½ cups granulated sugar 
1 tsp. pure vanilla extract 
1 cup cake flour 

Preheat oven to 375˚F. With the egg whites at room temperature add salt and beat to frothy. Add cream of tartar and beat until bubbles are small and white but shiny. Sift and measure the sugar. Fold ¾ cup sugar into beaten egg whites 1 tablespoon at a time to dissolve the sugar thoroughly. Sift flour and ¾ cup sugar four times. Fold gently into meringue ½ cup at a time. Gently fold in the vanilla and fill a 10-inch UNGREASED tube cake pan. Bake 30-35 minutes at 375˚F. Invert the pan to cool… DO NOT loosen the cake from the pan until the cake has completely cooled. 

Use a serrated knife and gentle sawing motion
Easy but certainly not fat free, is to decorate the cake with sweetened whipped cream, fresh fruit and berries. To fill; cut the cake in half, using a sharp, serrated (or bread) knife and a gentle sawing motion.  Once the cake is filled, fill the center hole with whipping cream and/or fruit and 'ice' the top and sides with the whipped cream.
To retain the Angel Cake fat free qualities, ice it with 'Seven Minute Frosting'. This easy frosting is cooked over simmering water, while beating for 7 minutes. The result is a fluffy, light icing that is sticky on the outside with a soft, marshmallow-like inside.  

SEVEN-MINUTE FROSTING        Yield: 3½ cups
This fluffy, no-fail icing must be used immediately.


2 egg whites 
1½ cups granulated sugar 
5 Tbsp. cold water 
1½ tsp. light corn syrup 
¼ tsp. cream of tartar 
½ tsp. pure vanilla or lemon extract 
3-4 drops of food coloring (optional) 

In the top of a double boiler, stir egg whites with sugar, water, corn syrup and cream of tartar until sugar dissolves. Place pan over simmering water and beat constantly with an electric mixer until mixture is stiff enough to stand in peaks when beaters are lifted, about 7 minutes. Remove from heat. Beat in vanilla, then food coloring drop by drop until frosting is desired color. Continue beating until icing is stiff enough to spread. Immediately spread icing over cake.
Filled, iced and decorated with fresh fruit and whipped cream
Till next time... have a safe, long weekend and Bon Appétit!


Photos by Sally Rae
Recipes from 'For the Love of Food' by Sally Rae 

Tuesday, July 19, 2016

Garlic Update 2016

Garlic drying - Day14
Garlic drying - Day 1
It has been several weeks since the garlic was pulled. As forecast, the rain and overcast sky appeared on what was planned as my harvest day. I was happy to get the job done a few days early during a sunny moment!

The drying racks are old window screens. They are elevated off the ground, with a fan at one end for increased air circulation. Full details of curing, cleaning and storing your garlic harvest was covered in last years garlic post.

Through our dreary, rainy, July days, these adorable knee high, 'Music Box Sunflowers' from Salt Spring Seeds were they only ray of sunshine in the yard
'Music Box Sunflowers' from Salt Spring Seeds

Till next time... Happy Gardening and Bon Appétit!

Photos by Sally Rae 

Tuesday, July 5, 2016

Impatiently Waiting for Summer

Since our early, high temperatures several months ago, the 'wet coast' is waiting for summer to kick in ... again! I have heard numerous people complain of garden plants put in early, now going to seed. I can only assume they are confused by our hot then cool weather. Although my pickling cucumber plants have produced a few handfuls of baby dills, the plants are only about a foot long. Several days ago I covered them with hoops and plastic and hope they perk up. Crazy... for July!!

It has been difficult to dry the garlic bed. I removed the mulch and stopped watering several weeks ago. We have had sprinkles of rain the past few days and my next available day to harvest is calling for 80% rain. In a panic, I pulled the garlic this afternoon when the sun came out. The roots held onto more soil than I wanted, it was still a bit too damp. Now that it is pulled, I just have to deal with it. 
Transporting the 2016 garlic harvest to the shed

We were at a friends place on the long weekend and toured their garlic harvest. The garlic was tied in bunches, with the roots removed, and hanging in a breezy open shed. I have always left the roots on for drying, but this year because they held so much soil, I decided to try cutting the roots from some of each variety. My 2015 garlic harvest featured photos and information for a few different options of drying. This year, most of the garden is a week or two ahead of last year. The garlic was pulled on July 9th in 2015 and on the 5th this year. I would have preferred to wait another 3-4 days, but again, with the threat of rain, decided early is probably better.

Time will tell if I made the right decision to harvest a bit early ...and to cut off the roots. At least with the rain and cool temperatures I can get a few batches of soup made for the freezer and not feel guilty about being inside. 

Till next time... Happy Gardening and Bon Appétit! 

Photo by Sally Rae

Saturday, June 25, 2016

Early Summer in the Garden

Brassicas with trays for shade
Compared to last June, it seems most of this month has been rainy and cool. In the next day or so, it is supposed to turn around to hot temperatures again, so get prepared to shade delicate plants. We had some early, really hot, sunny weather that made planting seedlings a challenge. If some sort of shade was not used, most plants burned or wilted. There are numerous ways to shade the seedlings, I find plant trays with holes and a bamboo stake fast and easy. They can be set up horizontal or vertical, see Brassicas photo. 

 Burlap to protect from sun and heat
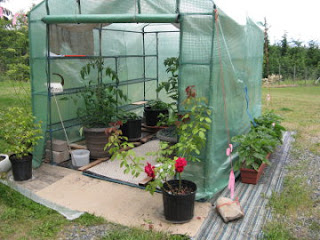
In the portable greenhouse, shade is created by a piece of burlap suspended inside, from the center and side supports. Another way to use burlap for a larger area is to use inverted tomato cages fairly close together. Push the top metal ring into the ground and anchor with a rock or tent peg. Gently arrange the burlap and push onto the upward facing tines to suspend it above the plants and hold it in place. This is sturdy in a light wind and allows air to circulate. I used this shade method last year along with cardboard and plant trays.   

When the shade trays are removed from all varieties of squash, each hill gets a stake placed as a marker for watering. When the plants get large and spread out, the stake is where the stem and roots are, so hand watering is easy. This is also done with pickling cucumbers and any other sprawling plants.

Bamboo stakes for squash
The garlic bed in the background is not quite ready to harvest. With warm, dry weather promised, I will pull a few test heads and carry on with my garlic harvest that I documented last year. In preparation for harvest, the straw mulch was removed from the bed today. Two weeks before harvest, or about the third week in June, I stop watering that bed.
Tomatoes, pruned and staked

The tomatoes have been staked for support. These plants are my 'Outdoor Salsa', now being sold on Denman through Annie Siegel as 'Sally's Salsa'. For all tomatoes, I prune leaves from the bottom so none touch the soil. Also prune out all suckers, (except one) that start growing from the leaf attachment on the stem. I allow the main stem and one off shoot, both are staked separately. With this particular variety, once the fruit is pollinated, I leave only 2-3 fruit per set. My main goal with these is seed saving and keeping this variety of very large fruit with few seeds. I am hoping to break my previous record weight of 1lb. 10-1/4oz for one tomato, from two years ago!

Strawberry hoops and netting
In the strawberry patch, I have tried several different methods of protecting the harvest from the birds. This is my second year using hoops and netting. It can be installed by one person with no lifting of awkward, heavy, frames required. These hoops were from Lee Valley and have become one of my favorite garden helpers! They can be used to support plastic, burlap, remay, or netting. Secured on the sides and end of the raised bed with 1"x1" wood strips that are light weight and easy to remove for picking. 
Desert King Figs

I was thrilled to count 65 figs ripening on my Desert King tree. The photo shows an area of the tree where I pinched the bud tips in the spring. Each of these branches produced 4-5 figs and several new shoots for next year's fruit. I am still working on the pruning and pinching method and realize some of these new shoots are on branches that will be pruned in the fall. Obviously my experiment needs to be tweaked. The tiny branch from my April 27th post  
Bud tip was pinched in April
is ripening nicely and this close up photo shows the new shoots, where I thought only a leaf would grow. 


Well, that's the tip of the iceberg around the garden these days! We have been enjoying fresh sugar snap peas, strawberries, cucumbers and baby zucchini. It is great to have longer days, be outside and have dirt under my fingernails. The weeds have got the best of me and taken over in some areas but such is life in Paradise!

Till next time... Bon Appétit and Happy Canada Day!

Photos by Sally Rae