Saturday, June 25, 2016

Early Summer in the Garden

Brassicas with trays for shade
Compared to last June, it seems most of this month has been rainy and cool. In the next day or so, it is supposed to turn around to hot temperatures again, so get prepared to shade delicate plants. We had some early, really hot, sunny weather that made planting seedlings a challenge. If some sort of shade was not used, most plants burned or wilted. There are numerous ways to shade the seedlings, I find plant trays with holes and a bamboo stake fast and easy. They can be set up horizontal or vertical, see Brassicas photo. 

 Burlap to protect from sun and heat
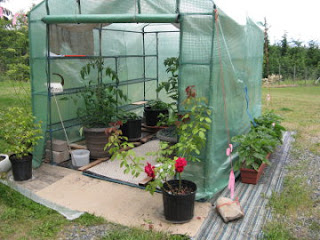
In the portable greenhouse, shade is created by a piece of burlap suspended inside, from the center and side supports. Another way to use burlap for a larger area is to use inverted tomato cages fairly close together. Push the top metal ring into the ground and anchor with a rock or tent peg. Gently arrange the burlap and push onto the upward facing tines to suspend it above the plants and hold it in place. This is sturdy in a light wind and allows air to circulate. I used this shade method last year along with cardboard and plant trays.   

When the shade trays are removed from all varieties of squash, each hill gets a stake placed as a marker for watering. When the plants get large and spread out, the stake is where the stem and roots are, so hand watering is easy. This is also done with pickling cucumbers and any other sprawling plants.

Bamboo stakes for squash
The garlic bed in the background is not quite ready to harvest. With warm, dry weather promised, I will pull a few test heads and carry on with my garlic harvest that I documented last year. In preparation for harvest, the straw mulch was removed from the bed today. Two weeks before harvest, or about the third week in June, I stop watering that bed.
Tomatoes, pruned and staked

The tomatoes have been staked for support. These plants are my 'Outdoor Salsa', now being sold on Denman through Annie Siegel as 'Sally's Salsa'. For all tomatoes, I prune leaves from the bottom so none touch the soil. Also prune out all suckers, (except one) that start growing from the leaf attachment on the stem. I allow the main stem and one off shoot, both are staked separately. With this particular variety, once the fruit is pollinated, I leave only 2-3 fruit per set. My main goal with these is seed saving and keeping this variety of very large fruit with few seeds. I am hoping to break my previous record weight of 1lb. 10-1/4oz for one tomato, from two years ago!

Strawberry hoops and netting
In the strawberry patch, I have tried several different methods of protecting the harvest from the birds. This is my second year using hoops and netting. It can be installed by one person with no lifting of awkward, heavy, frames required. These hoops were from Lee Valley and have become one of my favorite garden helpers! They can be used to support plastic, burlap, remay, or netting. Secured on the sides and end of the raised bed with 1"x1" wood strips that are light weight and easy to remove for picking. 
Desert King Figs

I was thrilled to count 65 figs ripening on my Desert King tree. The photo shows an area of the tree where I pinched the bud tips in the spring. Each of these branches produced 4-5 figs and several new shoots for next year's fruit. I am still working on the pruning and pinching method and realize some of these new shoots are on branches that will be pruned in the fall. Obviously my experiment needs to be tweaked. The tiny branch from my April 27th post  
Bud tip was pinched in April
is ripening nicely and this close up photo shows the new shoots, where I thought only a leaf would grow. 


Well, that's the tip of the iceberg around the garden these days! We have been enjoying fresh sugar snap peas, strawberries, cucumbers and baby zucchini. It is great to have longer days, be outside and have dirt under my fingernails. The weeds have got the best of me and taken over in some areas but such is life in Paradise!

Till next time... Bon Appétit and Happy Canada Day!

Photos by Sally Rae 

Thursday, June 9, 2016

A Craving for Chicken Salad

Everybody loves a good chicken salad sandwich. It's a great use of leftover chicken or turkey meat. Quench a craving with this twist on a classic! Dried cranberries add sweet, tart and color to the filling, celery adds crunch and walnuts add texture.

The type of sandwich you prepare will determine how chunky or fine the filling is diced. For everyday lunch sandwiches; the filling can be cut a little chunky and simply spread on buttered bread with lettuce. For use in a wrap; add a bit more mayonnaise for spreading consistency and dice all ingredients a bit smaller. Place a lettuce leaf on each wrap, spread the filling on the lettuce, covering three quarters of the wrap. Position a row of small avocado wedges or pickle spears and roll up. For pinwheel sandwich filling; add more mayonnaise and the ingredients should be very finely diced, almost minced. Your gluten free guests can also enjoy the feast... serve the chicken salad as a dip with rice crackers or rice cakes on the side.

CHICKEN SALAD SANDWICH FILLING       Yield: 2-3/4 cup filling

Once mixed, the chicken salad can be kept refrigerated for one day. This will allow the flavors to marry and improve.

2 cups diced, cooked, chicken meat 
Chicken Salad~sandwich, wrap, pinwheel sandwich and dip
1/4 cup celery, diced
1/4 cup dried cranberries, chopped 
2 Tbsp. walnuts, coarsely chopped
2 Tbsp. sweet Vidalia onion, diced
1/2 cup Real Mayonnaise
1 Tbsp. Dijon 
1/2 tsp. sea salt 
1/4 tsp. coarsely ground black pepper
1/4 tsp. granulated garlic

In a medium bowl, gently toss together the chicken, celery, cranberries, walnuts and onion. Sprinkle over the salt, pepper and granulated garlic and gently stir to mix. Add the Dijon with about half of the mayonnaise, then add more mayonnaise to the desired consistency. Taste and adjust seasoning.

Till next time... Bon Appétit!


Photo and recipe by Sally Rae