Monday, December 28, 2015

Tortilla Torte Recipe

The gifts have been opened and put away. Greeting cards from friends and family still decorate the house. The turkey and leftovers are behind us but there are still more celebrations to come this week. This quick and easy torte went over well with rave reviews for our Boxing Day Brunch. There are still a few opportunities through the holidays to give it a try.

I made a few substitutions to the recipe below to accommodate those of us who react to the night shade family. Ancient Grain Tortillas, although not as colorful, are my favorite substitute and I replaced the sun-dried tomatoes with chopped, marinated artichokes and sliced black olives. 

TORTILLA TORTE                                           Yield:  8-10 servings
This simple recipe is great served hot or cold. I like to use sun-dried tomato or spinach tortillas for added color and flavor.  

5 x 12-inch sun-dried tomato, flour tortillas
3 cups sautéed vegetables—cooled and drained of excess liquid
Tortilla Torte served with guacamole and Greek yogurt
 

    (2 onions, 1 zucchini, 2 tsp. granulated
    garlic, 1 tsp. cumin powder, ½ tsp.  
    Chipotle chili pepper)
2 cups grated Jack cheese
2 cups grated Cheddar cheese
2 cups black beans (cooked or canned) -rinsed, drained and chilled
¼ cup basil pesto
¾ cup marinated sun-dried tomatoes, drained and julienne cut
¼ cup fresh basil, chiffonade
Sour cream (or Greek yogurt), salsa and/or guacamole for serving

Spray a 12-inch spring form pan with non-stick cooking spray, or a light coat of olive oil and set aside. Sauté vegetables, place in a colander over a bowl and allow to drain and cool. In a large bowl, mix grated Jack and Cheddar cheese together, set aside. Preheat oven to 350˚F. Place the first tortilla in prepared pan and spread with half of the black beans; then sprinkle evenly with one cup of cheese mix. Place the second tortilla on top and gently press down. Repeat with remaining beans and 1 cup of cheese mix. Place the third tortilla on top, gently press down, and spread with cooled sautéed vegetables. Place the fourth tortilla on top, gently press down then spread evenly with the basil pesto, adding ½ cup of the sun dried tomatoes on top. Cover with the last tortilla and top with sun dried tomatoes, fresh basil and remaining cheese mix. Bake for 15-20 minutes at 350˚F. Cool for 30 minutes, remove side of the spring form pan and cut into wedges. Serve with sour cream, salsa and/or guacamole

Till next year... Happy New Year and Bon Appétit!


Recipe from 'For the Love of Food' by Sally Rae 
Photo by Sally Rae

Monday, December 21, 2015

When Good Food Goes Bad

By mid December we already had two power outages due to the heavy winds pummeling our Island and the surrounding Coastal regions. 
I first published this material 3 years ago in the 'Denman Island Flagstone' but I am still getting questions about power outages and what to do with freezers, so thought I would run it again. The Denman Island ‘hurricane’ of December 11th, 2006 sparked the idea for this column. Our household on Denman Island was without hydro for 6 days. 

When your fridge or freezer fails or there is a power outage, don’t panic. 
All frozen foods should be stored at 0F(-18C) or lower, your fridge should be kept at 40F(4C) or lower. A fully stocked freezer will keep foods frozen for two days after losing power. A half-full freezer can maintain freezing power for roughly one day. Of course not opening the freezer during the outage is ideal and I have found placing a quilt over the freezer also helps.

When the power goes off in the fridge, you can normally expect your food to last at least four to six hours, depending on how often it is opened and how warm it is in your kitchen. You can add block ice to the fridge if available or if it is cold enough outside, move the perishables into a cooler with ice packs and place outside on the porch. If we have snow on the ground, although not common around these parts, I place the perishables in plastic bins and bury it in the snow on the deck.

If you have access to it, 25 pounds of dry ice should hold a 10-cubic foot freezer below freezing for 3-4 days. Dry ice must be handled carefully as it freezes everything it touches. Wear heavy gloves and have the merchant place it in your cooler or a cardboard box.

The key to salvaging food when the power fails is to react quickly. Perishable foods are not considered safe after they have been at room temperature for more than two hours. The following is a guideline for some common foods kept in our refrigerators and freezers. Commercially prepared mayonnaise, ketchup, salad dressings and steak sauces are generally high in acid and are probably safe to keep; however use these products up as soon as possible. Fresh or cooked eggs, meat, poultry or seafood should NOT be used if they have been at temperature higher that 40F(4C) for more than two hours. Cheese, pecans and other nuts should be safe unless they have mold on them. Frozen fresh fruits are relatively safe due to their acid content. When starting to spoil, they usually ferment. A little fermentation will not make the fruits dangerous to eat, but it will spoil their flavor. You can refreeze thawed fruits if they smell and taste good or you can use them in baking and cooking.

Here is a guideline for what foods can be refrozen. Please note; foods will not be fit for refreezing if they have reached temperatures of 40-45F after having passed through the slow temperature changes that occur in a freezer when not operating. Meats, fruits and vegetables that still contain ice crystals should be safe to refreeze. However, be aware that even partial thawing then refreezing will reduce the quality of the foods. Meats lose juices and flavor and become darker in color, fruit becomes soft and satisfactory only for use in cooking (e.g.; jams and jellies) and vegetables may toughen. The quality of red meat is probably reduced less than that of most other foods. Use refrozen foods as soon as possible.

Frozen foods that should not be refrozen are; ice cream, cream pies and poultry. Vegetables and prepared foods that were completely thawed should not be refrozen.

When the hydro is restored, it is very important to make a thorough examination of the freezer contents. Without knowing the condition of the food before refreezing it is impossible to determine its safety. You should look at the various foods for ice crystals. Some parts of the freezer may be warmer than other parts, so check food throughout the freezer. I have a client who is away for the winters, she places zip lock bags of ice cubes in various locations of the freezer. When home in the spring, if the bags contain cubes of ice, the freezer kept its temperature. If they contain melted and refrozen water, she throws out the food in that area. The upper baskets are a good location to place a bowl of ice cubes for a test of how well your freezer kept cold. 


During a power failure, cooking and eating habits must change. On Denman, most of us have a wood stove or outdoor BBQ, but cooking times must be considered and cook only the quantity that can be used in one meal. Many foods can be skewered, grilled or wrapped in foil to cook in a fireplace. Candle warmers and fondue pots may be used if no other heat sources are available. Never use fuel-burning camp stoves, charcoal burners or propane barbecues inside your home; the fumes can be deadly. 
Canned, powdered or processed milk may be substituted for fresh milk, although treat them as fresh after opening. 
Meeting Santa for the first time
If you have uncooked meat in your fridge when the power goes out, you can extend the shelf life by cooking it immediately to the proper temperature and keeping it on ice until ready to reheat and serve. 
Be sure to sanitize hands and surfaces (including taps, sinks, counter tops, fridge door handles) thoroughly before, during and after food preparation. Change cloth towels often, or use disposable paper towels. I keep a labelled spray bottle of bleach solution (1tsp/5ml household bleach to 3c/750ml water) and a container of hand sanitizer, or wipes beside the sinks during a power outage. 

And last but not least, avoid cross contamination; clean all knives, cutting boards and utensils used with raw foods before using them again. 
You cannot tell if food is safe by smelling or looking at it. IF IN DOUBT THROW IT OUT! 

Till  next week, from my home to yours... Merry Christmas and Bon Appétit!

Photo by Sally Rae 

Tuesday, December 15, 2015

How to Cook a 10lb. Turkey in 2-1/2 hours

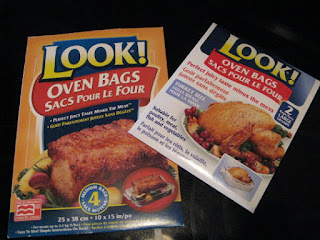
I can't remember when I first used 'LOOK Oven Bags', but to this day I keep a package on hand for a quick, easy, no mess turkey dinner.

Available in grocery stores in the food wrap aisle
*The cooking time will vary for 
different sized turkeys.*

The easy to use directions and chart are provided on the package...

Preheat oven as directed for specific meat. DO NOT use 'LOOK Oven Bags' at temperatures higher than 400F.

1.) Add a tablespoon of flour to the bag and shake to coat, to protect against bursting. 
2.) Season the meat and place in the bag. Add liquid if called for. Close bag with plastic tie that is provided.
*Chef's Note: Before closing the bag; I add a few fresh sage leaves, 4-6 whole garlic cloves, 3-4 stalks of chopped celery and 2 large onions quartered. 
3.) In the top of the bag, cut six, half inch slits and place the meat in bag in a large baking pan. The oven bag should not hang over the pan. 
4.) Place pan on lowest rack of oven, allowing room for bag to expand without touching oven walls or racks. Bake following the directions from the chart for; roast beef, roast pork, ham, whole chicken or whole turkey stuffed or unstuffed. Or until the internal temperature of the thigh meat reaches 180F (85C).  
5.) To serve, carefully open bag to avoid steam. 
Season, close bag with tie, place in large pan

The meat stays moist in the bag. The resulting juices can be strained and used for a delicious gravy and clean up is a snap. If you are expecting a beautiful looking, photo-ready, cooked bird, forget this method... go back to oven roasting and get out your turkey baster! 
On the other hand, if you want an easy method where you don't have to baste or watch the bird and clean up is a breeze, this method is great!

You will find 'LOOK Oven Bags' at your local grocery store in the aisle with food wraps.

Till next week...

Happy Cooking and Bon Appétit!

PS~be sure to check out the comment below on cooking goose in a 'LOOK!' oven bag!  sr


Photos by Sally Rae     

Saturday, December 5, 2015

Preparing for the Holidays

It's hard to believe the holidays are only weeks away! Craft Fairs around the Island are in full swing. Surrounding cities, towns and their stores are becoming a bit crazy to navigate. I don't shop for gifts, but instead head to the kitchen to prepare my 'foodie gifts' and stock the freezer with goodies for last minute entertaining, hostess gifts and pot luck gatherings.
Hand Dipping Truffles
I have prepared an assortment of handmade chocolate truffles this year to be presented as special gifts for family and friends. A few trays of my 'Fruit and Nut Bark' (recipe below) round out the decadent chocolate portion of preparation. 
As a kid, I remember my Mom filling the freezer with tins of fancy cookies and squares for the holidays... I also have fond memories of sneaking into the huge chest freezer and munching down frozen cookies! I carry on the tradition of filling the freezer with special baking for last minute gatherings or impromptu guests. 
1/3 slab with Chocolate Buttercream Icing 
~Vanilla and Mint Brownie squares~

'Triple Chocolate Brownies' (recipe page 167~For the Love of Food) yields a big batch. For a fast assortment; once cooled, cut the slab of brownies into 3 equal sized pieces. Decorate one piece with chocolate butter cream, the second with vanilla buttercream then drizzle with melted dark chocolate and the third with vanilla buttercream tinted green and flavored with peppermint extract and drizzled with melted dark chocolate. Chill well in the fridge ...until the icing is firm to the touch, then cut into serving-size squares.
Assortment of Chocolate Brownies made from one slab

Package in a clean tin, lined with plastic wrap. Place a sheet of wax paper or parchment between the layers of brownies, then freeze. Now you have a quick assortment of goodies ready to serve at the snap of your fingers! Fancy cookies and squares ready to serve from the freezer take off some of the stress and pressure of the season's entertaining. These are also a great item for Bake Sales or Dessert Tables because of the large yield from each recipe.

If you are looking for a quick and easy decadent chocolate treat, try your hand at making a batch or two of 'Fruit and Nut Bark'. This is so versatile... use dark, milk or white chocolate and any combination of fruit and/or nuts you like. 
 
FRUIT AND NUT BARK                    Yield: about 1-1/2 lb. bark 
Always use a ‘top quality’ chocolate, my preference is Belgian Callebaut. Lindt and Ghirardelli are other brands that would be suitable for this recipe.  
*Chef's Note: 'To Temper Chocolate’, go to my Helpful Tips Page http://www.gourmetbysallyrae.com/tips.html

1 lb. coarsely chopped ‘top quality’ chocolate; dark, milk or white
¼ cup whole cashews 
¼ cup pecan, halves or pieces 
¼ cup slivered almonds 
1 cup dried cherries, cranberries, blueberries OR raisins, chopped 
2 oz. white chocolate, for garnish 

Roast nuts in a 350˚F oven for 5-8 minutes, set aside to cool completely. Line a 9x13-inch cake pan with wax paper so it extends up sides of the pan and set aside. In a heatproof bowl over hot, NOT boiling water, melt chocolate. Never let the temperature of the chocolate rise above 104F or it will crystallize and become unusable. Stir until smooth, remove from heat. Stir in nuts and fruit. 

Pour into prepared cake pan, spread to all edges of the pan with a rubber spatula then lift the pan, holding wax paper and bang pan on the counter several times to settle and smooth the mixture.

Allow to cool slightly. Melt white chocolate and drizzle in fine strands over the finished bark. Refrigerate for 30 minutes or until the chocolate is firm. Remove from pan, peel off wax paper and break the chocolate bark into chunks. Layer pieces between sheets of waxed paper in an airtight container or pack in cello bags closed with a twist tie or ribbon and refrigerate for up to one month.

Till next week, Happy Baking and Bon Appétit!  

Recipe by Sally Rae
Photos, Chocolate Truffles and Brownies by Sally Rae